The new Blynk provisioning experience: native pairing, live device feedback, and full visibility
Getting a device online is the first thing your customer does with your product. We've made it faster, clearer, and — for the first time — fully visible from the console.
Published
August 20, 2026
Author
Henrik Holen
Setup is your product's first impression
A great provisioning flow sets the stage for the rest of the experience. It's the first real interaction between your customer and your product, it happens before they've built any familiarity with your app, and it's the step where a great out-of-box experience pays for itself many times over.
So we rebuilt it, end to end, around three goals:
A smoother flow that guides people through setup with fewer taps and clearer instructions.
A live connection to the device throughout setup, so the app can show exactly what's happening as it happens.
Complete visibility for developers, with every provisioning session logged and available in the console.
Here's what's new.
1. A setup flow built around what people actually do
Instructions front and center
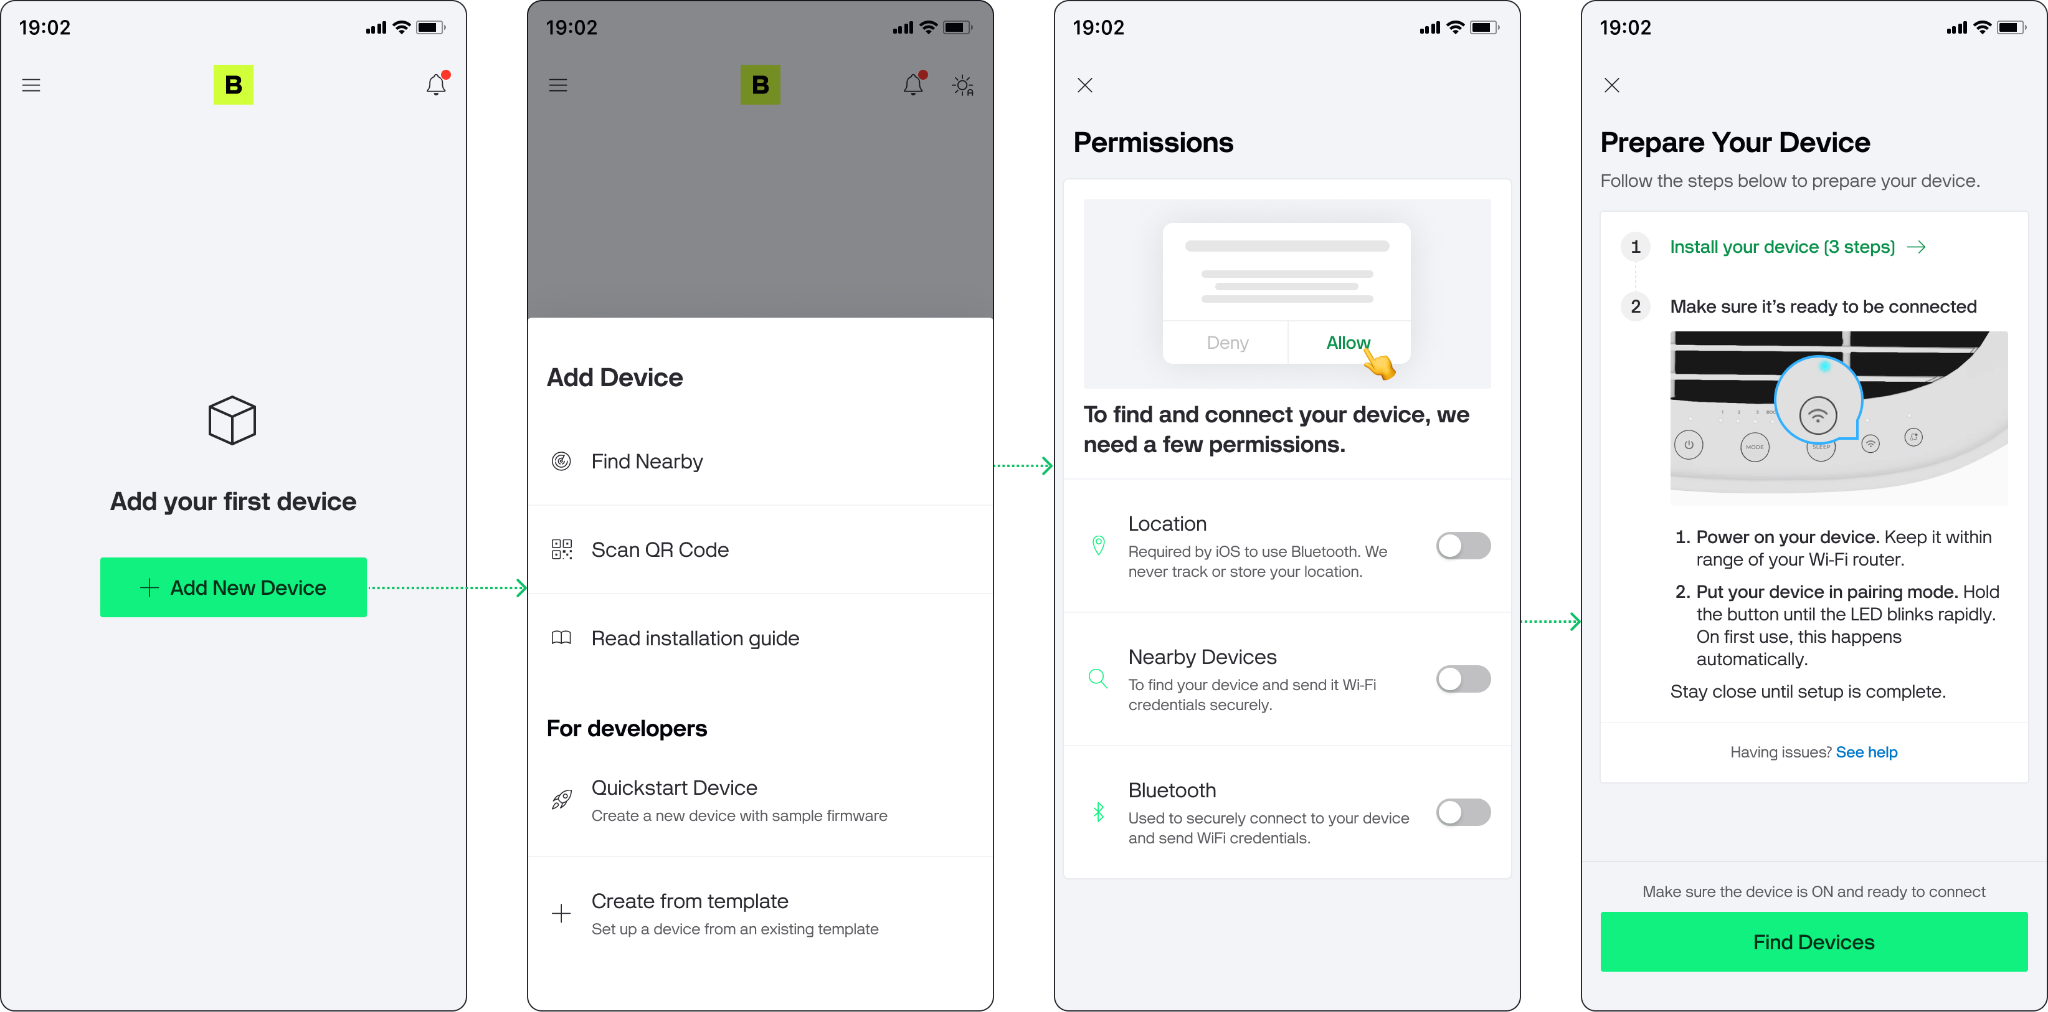
Preparation instructions now stand alone, letting the user properly engage with them. Permissions are requested up front on a dedicated screen, and device search begins when you tap "Find Devices", so nothing appears over the instructions while your customer is reading them, and the search starts when they're ready with the device in hand.
Preparation instructions that match the actual product
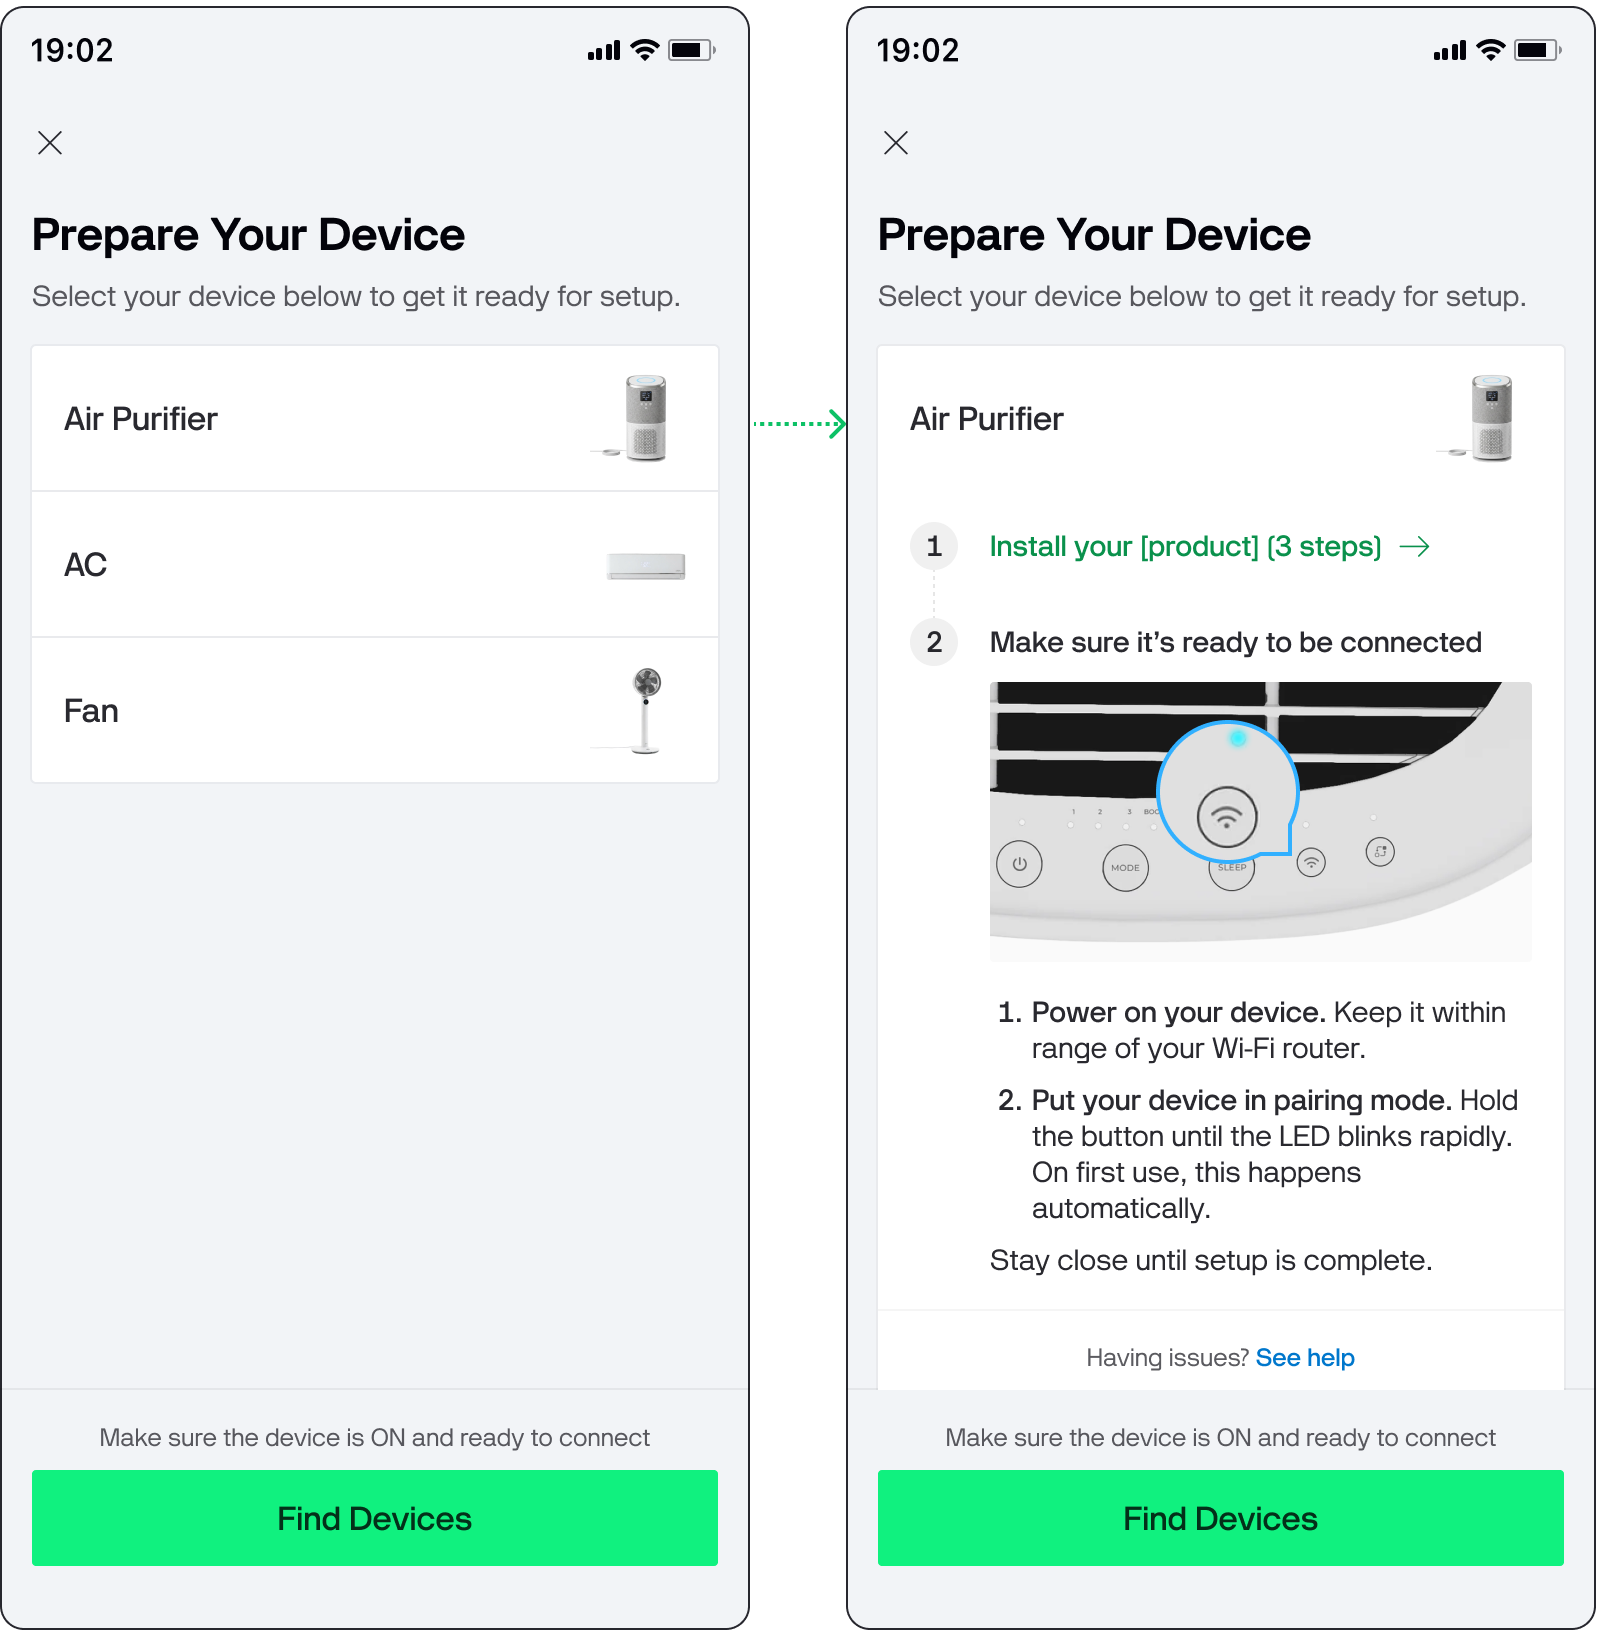
On the Enterprise plan, the preparation screen is driven by your template's User Guides, so your customer sees your product, like its photo, its button, its LED behavior:
Several templates that could match? The customer picks their product first, then gets that product's instructions.
Have a full installation guide? It's linked right there as a step.
Nothing configured, or on another plan? Clear generic instructions.
Native pairing on both platforms
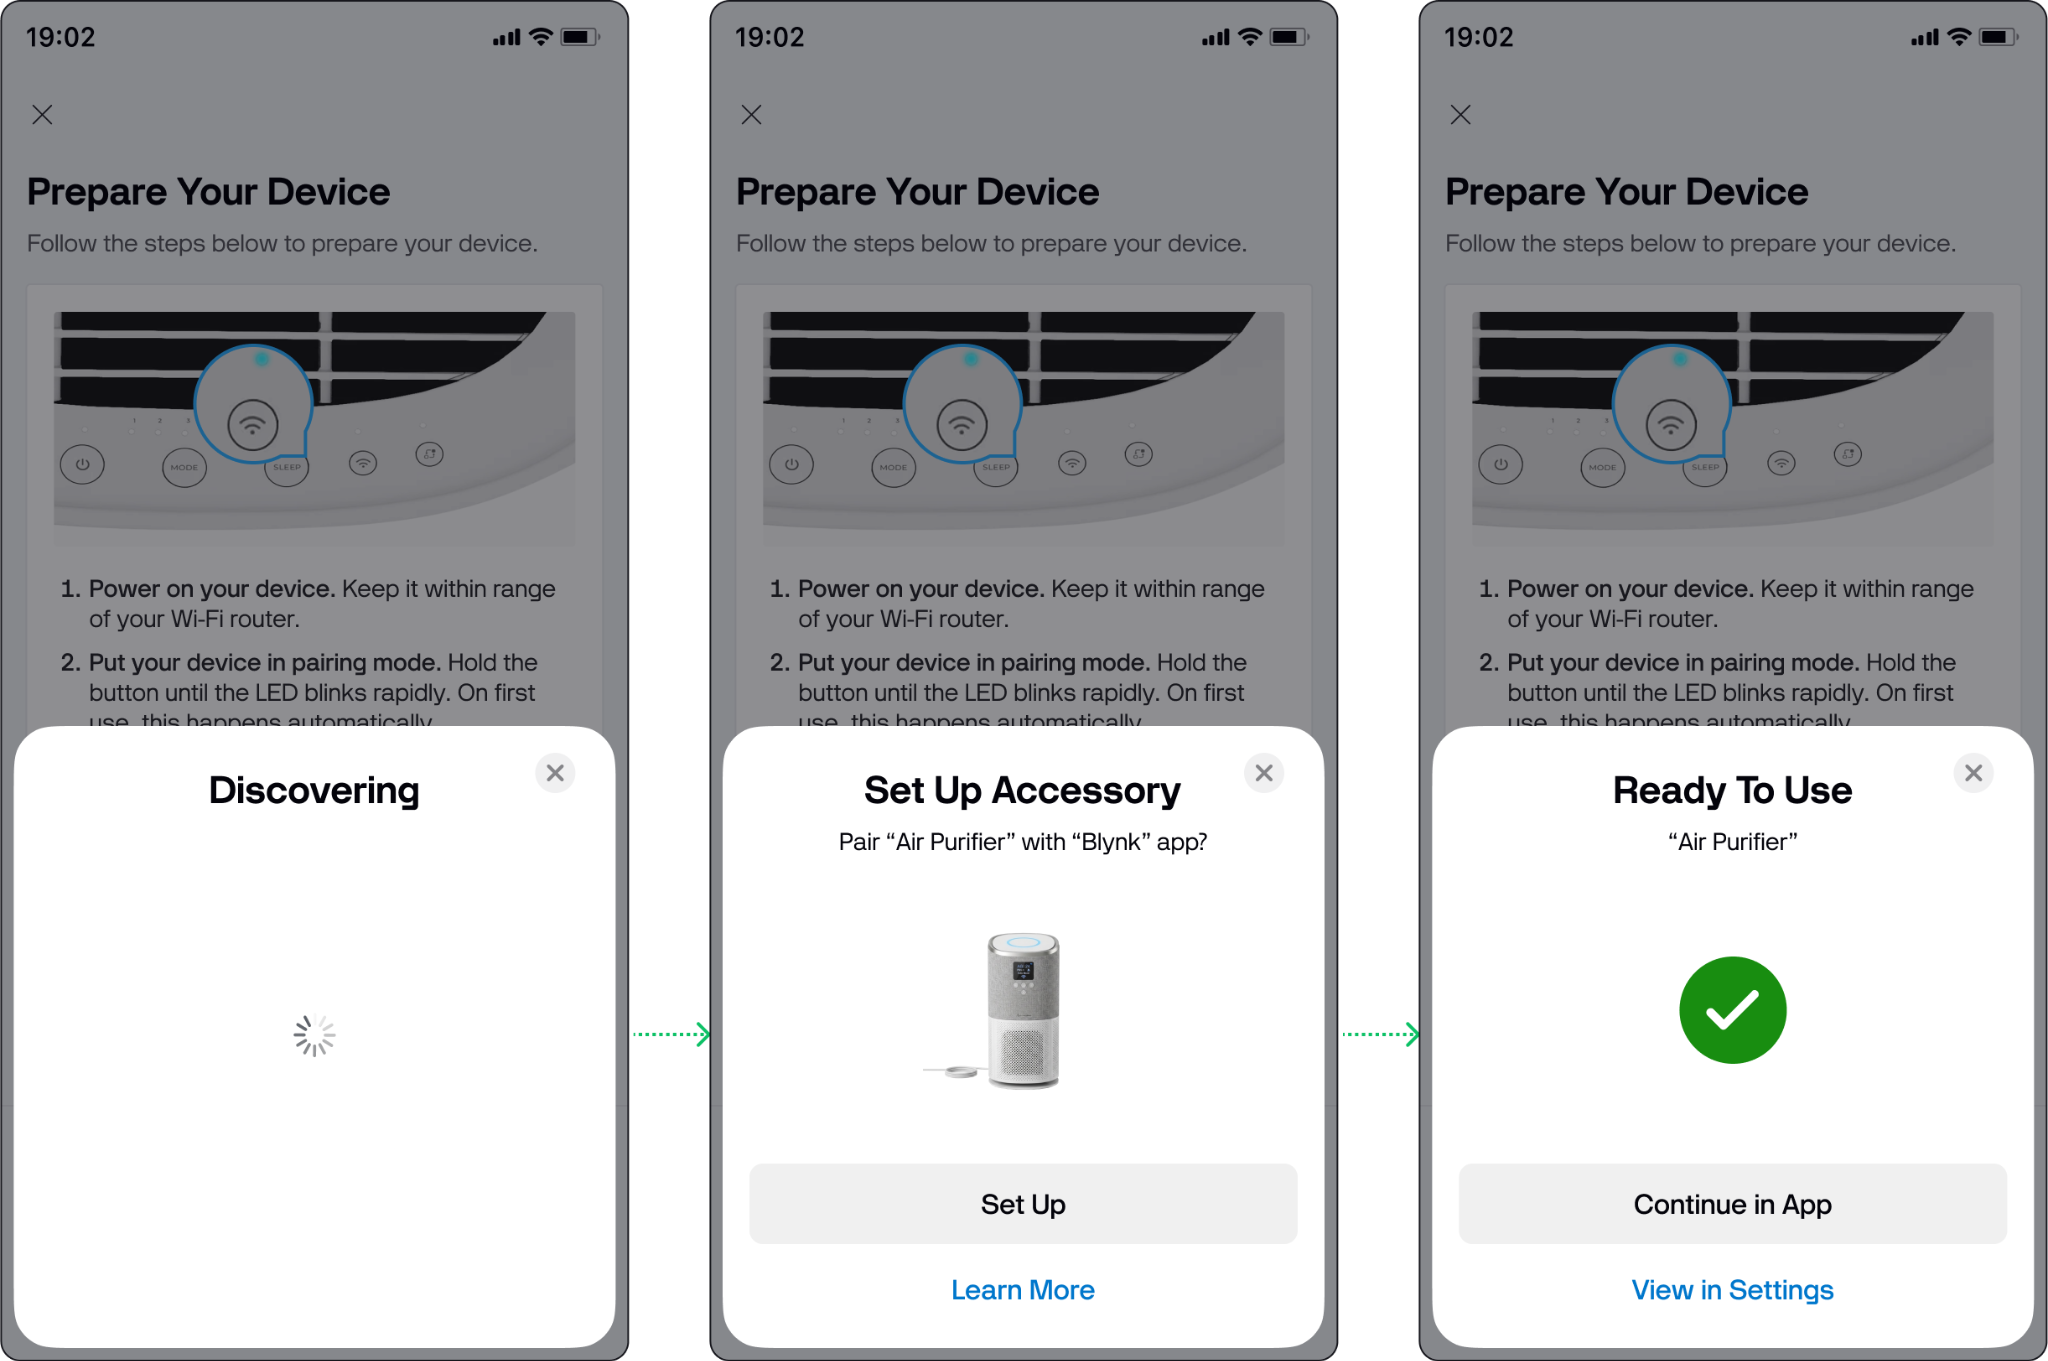
On iOS, setup now uses Apple's AccessorySetupKit. The system handles discovery and pairing in its own sheet, so access is granted as part of the native pairing prompt, with no separate permissions screen at all. Fewer taps, and a flow that looks like every other accessory your customer has set up on their phone.
On Android, the system's own device picker handles selection, then the app takes over to connect.
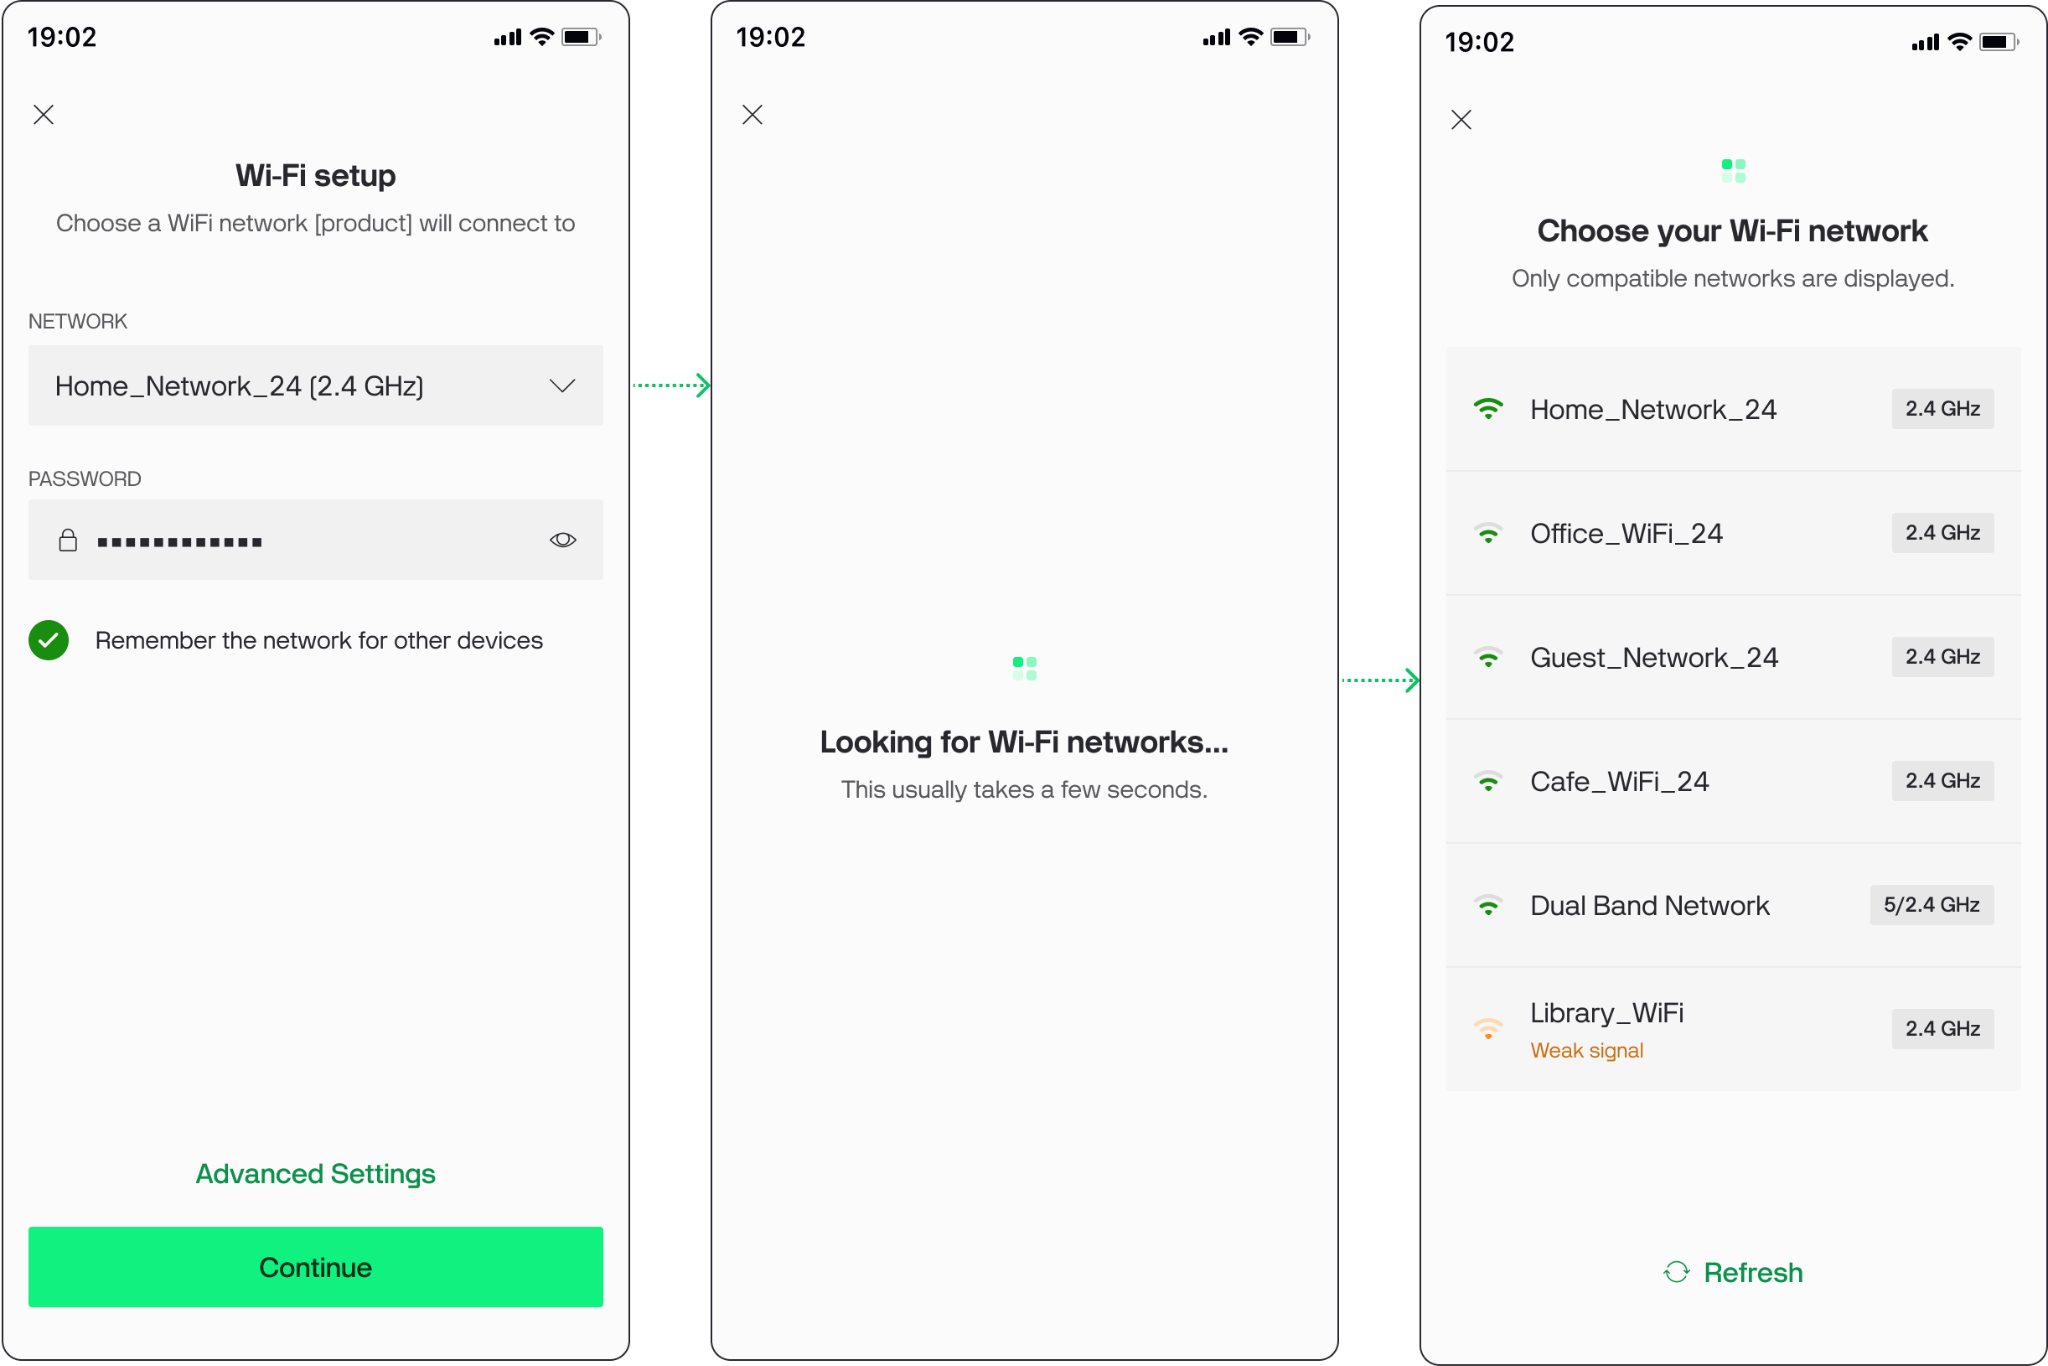
Wi-Fi setup that keeps people on the happy path
Only compatible networks are listed. If the device is 2.4 GHz-only, 5 GHz networks simply don't appear, making sure your customer only picks a network their hardware can actually join.
Weak networks are flagged. Select one anyway and you'll get a prompt suggesting you move closer or choose another.
Saved credentials carry over. Provisioned a device on this network before? The app offers that network directly instead of asking you to retype the password for device number seven.
Built for setting up more than one
Deploying a fleet is a different job from setting up a single device. If you've already provisioned a device on the same template with metadata, the success screen offers Apply saved configuration, letting you pick a recent profile, review it, then apply. No re-entering the same location and contact details for every unit.
Static Token (QR code) claiming got the same treatment: it now uses the same template-driven preparation screen as Wi-Fi provisioning, with Scan QR Code or Enter Manually if the code is printed as text. Cellular and Ethernet flows have been redesigned to match.
2. BLE-assisted provisioning: your device reports its status live
Classic access-point provisioning works like this: the device broadcasts a Wi-Fi AP, the phone joins it, sends credentials, and the device reboots to apply them. That reboot closes the channel between phone and device, so from that point on, the app is waiting rather than listening.
BLE-assisted provisioning keeps the Bluetooth connection open the whole way through. The device reports its state as it moves through each stage — joining the network, resolving DNS, reaching the cloud, authenticating — and the app shows that progress live.
What that makes possible:
Specific, actionable messages. "Wrong Wi-Fi password." "This network requires a login page." "Connected to Wi-Fi, but no IP address was assigned." Your customer learns what to change, in language that tells them what to do next.
Continue from where you left off. Mistyped the password? You land back on the password screen with what you entered still visible: fix the typo and carry on. Picked the wrong network? Straight back to the network list. No restarting the whole flow over one character.
Troubleshooting that points at your product. The troubleshooting link on the recovery screen comes from your template's User Guides, so you can send customers to your own help content.
Proximity warnings. The app detects when the signal between phone, device, and router is getting weak and suggests moving closer, while setup is still in progress. The warning clears itself once the signal improves.
Smart escalation. If the same issue comes up three times on the same device, the app offers a more direct route: contact support, or send app logs to help diagnose it.
And when you're testing with Developer Mode enabled, the screen also shows a Reason (the specific error identifier) and a Session ID, which brings us to the third piece.
BLE-assisted provisioning is supported by the standard Blynk.Edgent examples — exact support depends on your hardware. See the Blynk.Edgent overview to get started.
3. Provisioning Sessions: complete visibility in the console
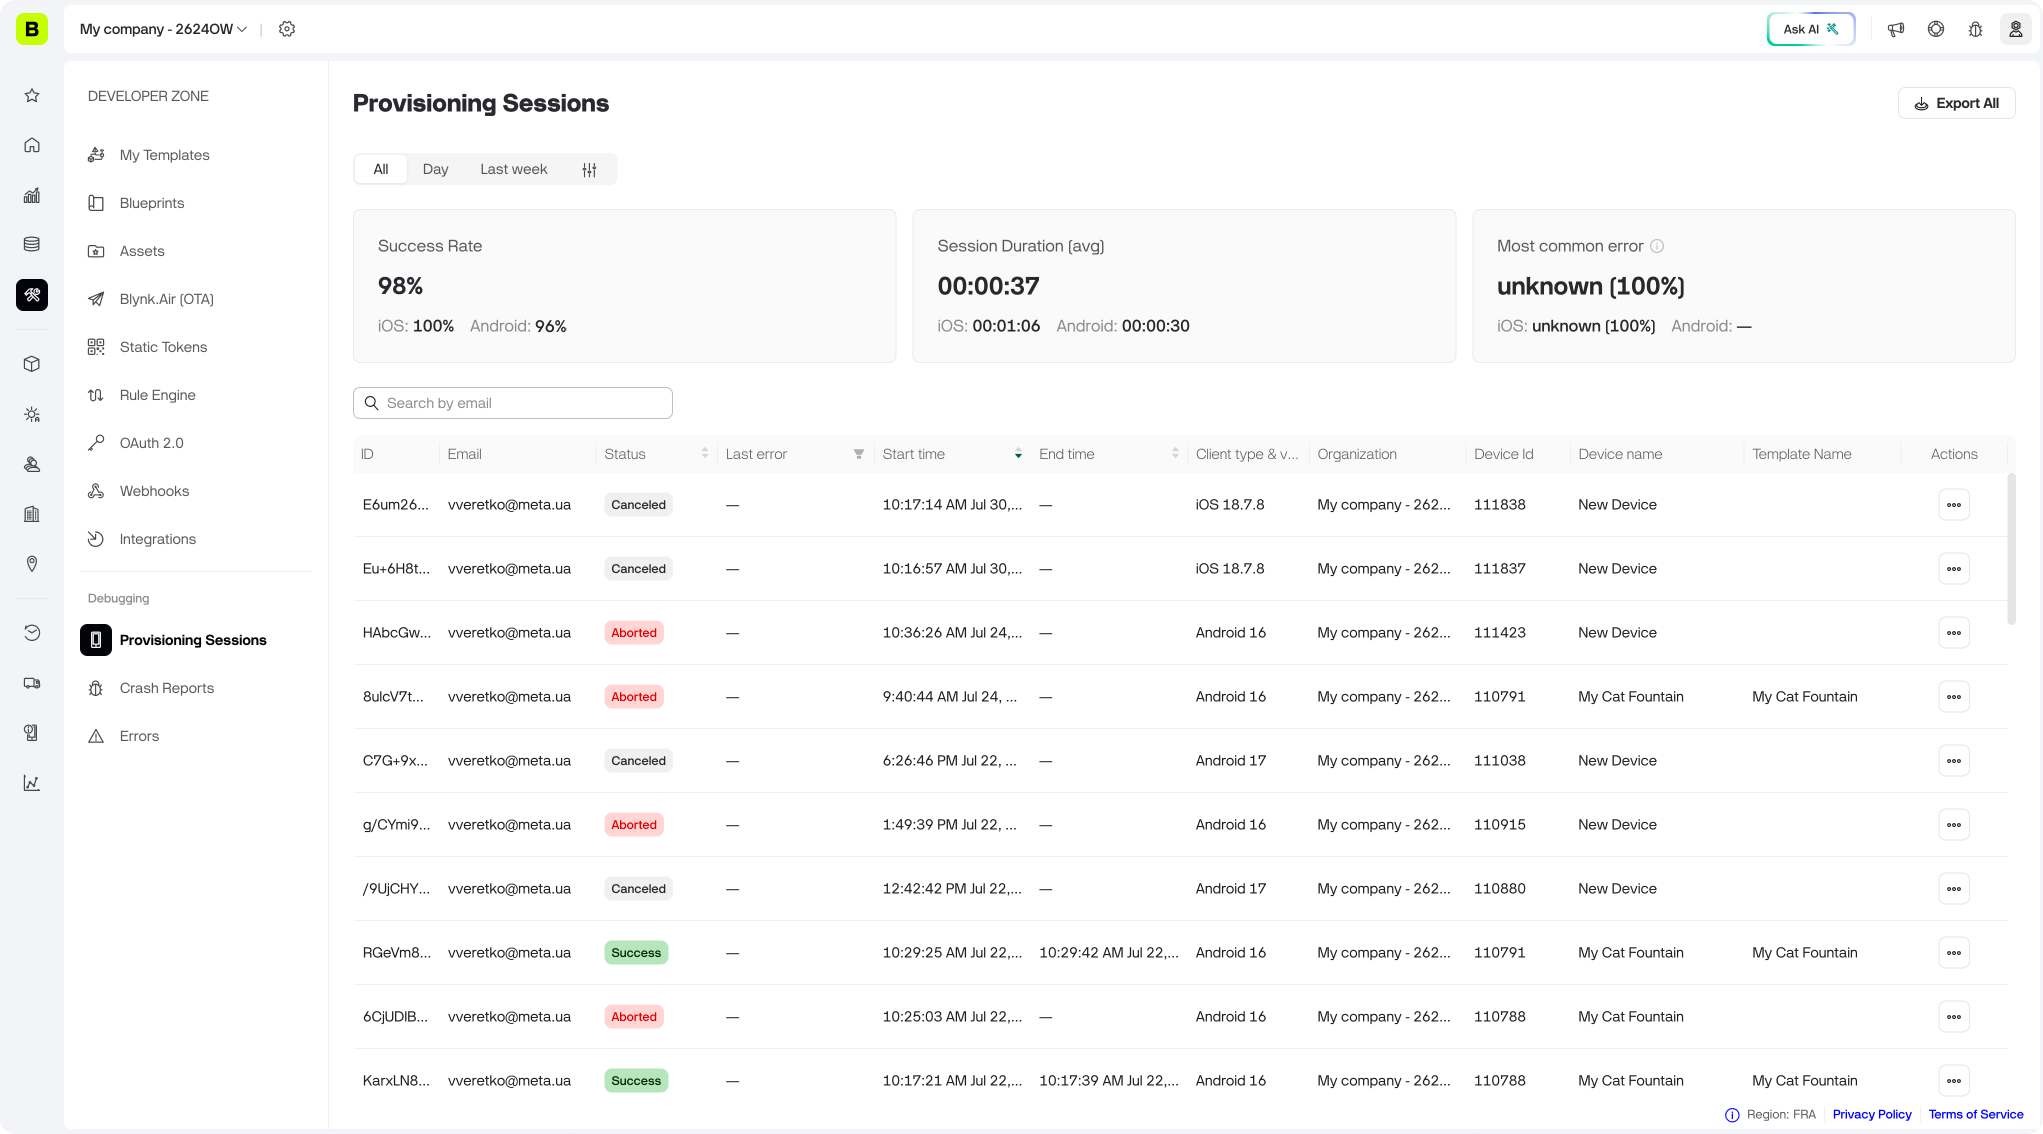
Previously, provisioning issues have been hard to debug, because they happened between a phone and a device, with no real insight at scale. Provisioning Sessions (Blynk.Console → Developer Zone → Debugging) brings all of it into the console: every setup attempt across your organization and sub-organizations, logged and searchable.
Aggregate health, at a glance
Three summary cards sit at the top, each split by iOS and Android:
Success Rate — the share of attempts that ended with a connected device. Sessions your customer chose to cancel are excluded, so the number reflects genuine outcomes.
Session Duration (avg) — how long setup actually takes in the field, which is often different from how long it takes on your desk.
Most Common Error — the single most frequent reason a session didn't complete, so you know what to look at first.
The iOS/Android split is more useful than it sounds. Anything platform-specific is nearly invisible in a combined number and obvious the moment you separate them.
Every session, with a status that means something
Each row is one attempt, with four possible outcomes:
Status
What it means
Success
The device connected.
Failed
The device itself reported an error.
Aborted
Something outside the device interrupted it — the app, the internet connection, or the server.
Canceled
The customer closed the flow themselves.
The distinction between Failed and Aborted is deliberate: one points you toward firmware or the customer's network, the other toward connectivity or the platform. Different investigations, so they're counted separately.
Filter by email, date range, or error code; sort by any column; export the whole filtered set to CSV for offline analysis.
The full timeline of a single attempt
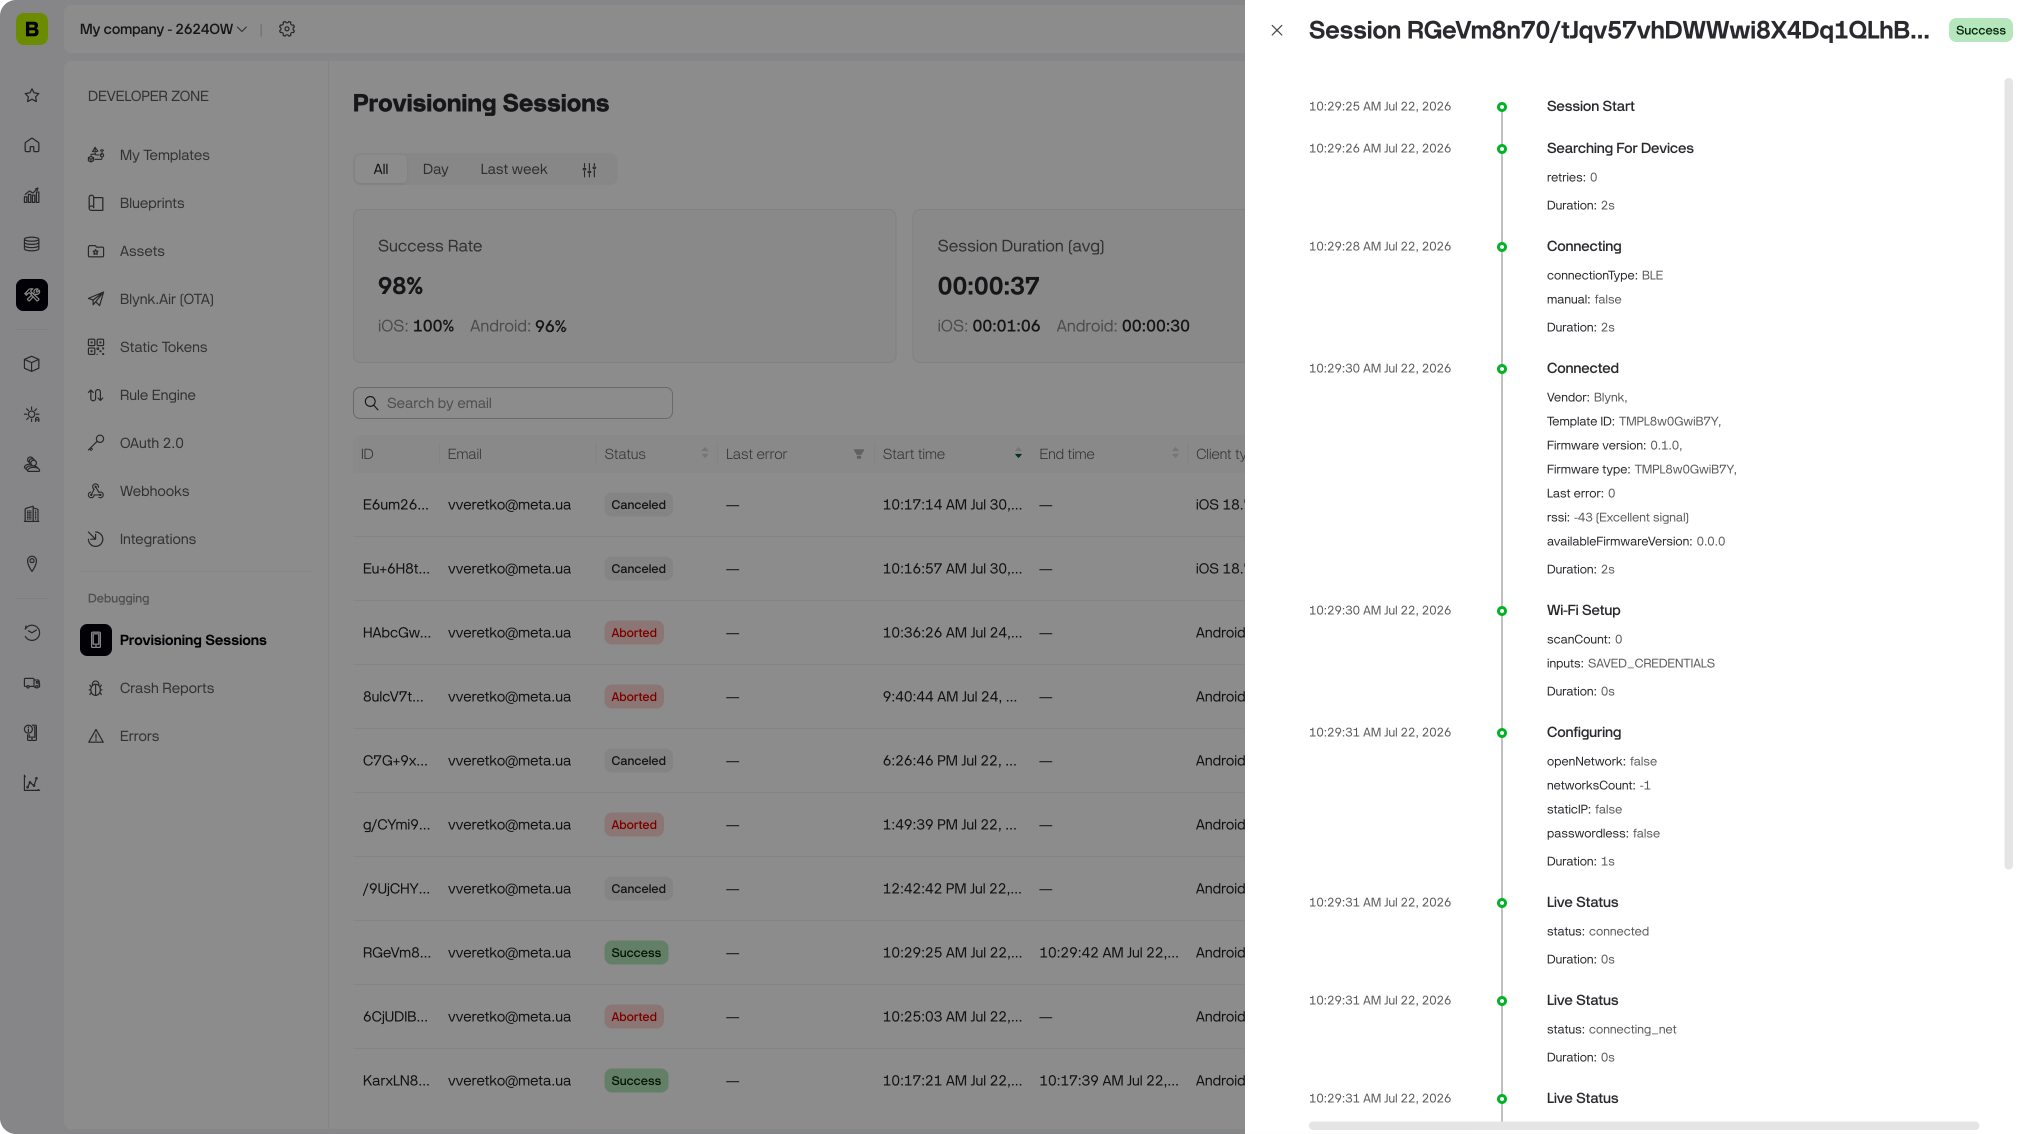
Click any session to open its step-by-step timeline. For a BLE-assisted device you'll see the connection type "BLE".
Every step carries its own timestamp and duration. You can see where the time went, what signal strength the device reported, what firmware it was running, and how the session ended.
This turns a general impression into an actionable finding. Something like "on Android 14, sessions are stalling at Configuring with net_fail_no_ip_assigned" tells you it's a DHCP issue and points straight at the fix.
When a developer sends you a Session ID from an error screen, you can pull up that exact attempt. If the report came from an end customer, who doesn't see Session IDs, search by their email or the approximate time instead.
What this means if you're shipping a product
More customers finish setup on their own. Specific messages and in-flow recovery mean many issues get resolved by the customer in the moment, without a support ticket.
A metric you can improve. Success rate and most-common-error per platform turn setup quality into something you can track release over release.
Faster fleet deployment. Saved configurations and saved network credentials cut real time per unit when installers are setting up devices in bulk.
A setup experience that feels native. AccessorySetupKit on iOS and the system picker on Android make setup feel like part of the phone.
Getting started
The app-side improvements are already there — provisioning through Blynk.Apps picks up the new flow with no firmware changes required. To get the most out of it:
Use BlynkEdgent example from a new standalone BlynkEdgent library available in Arduino IDE LibraryManager
Provision your device via the test app by scanning for nearby devices in the top-right menu.
Open Provisioning Sessions after your next batch of setups. → Blynk.Console → Developer Zone → Debugging
Improve experience even further
On Enterprise, you can create custom device activation guides with User Guides, so customers see your product's real instructions and your troubleshooting link. → User Guides
Give it a try with your next device, take a look at your Provisioning Sessions, and tell us what you think — we're keen to hear how it performs with your hardware and your customers.
Sign up for a newsletter
Get latest news from Blynk
Over 500,000 people already signed up our newsletter. We never spam.
Thank you! Your submission has been received.
Oops! Something went wrong while submitting the form.





.png)