Weather Monitoring on ESP32 (WiFi provisioning & OTA)
Blueprint is a pre-configured template on the Blynk IoT platform, that will help you create a fully functional project in a few minutes. It already includes mobile and web dashboard UI, working firmware, and a tutorial to help you connect your device to the Blynk IoT platform and control it from the app!
On this page you can review the blueprint to have an idea of the ready project you are going to get. Sign up for a free account on the Blynk IoT platform to try it out.
Introduction
This blueprint will help you create a weather station for your home in no time! Using a single ESP32 board and two sensors, we will create a full-fledged weather station that monitors four key parameters: temperature, humidity, pressure, and altitude.
The blueprint includes Blynk.Edgent solution, which means you will be able to activate the device via your Blynk app just by entering your WiFi credentials (WiFi provisioning in action) and perform OTA firmware updates once device has been connected!
Additionally, we will implement automations to send notifications to your Blynk app when the temperature falls below or exceeds the comfortable range for your home. You will also get notified about excessively high or low humidity levels. This will help you maintain a comfortable microclimate within your home. Sounds great? Let’s get started!
Components Used in This Project
Blynk Console and Blynk App for web and mobile dashboards
Arduino IDE or PlatformIO to upload a firmware
ESP32 Dev Module
DHT21/AM2301A humidity and temperature sensor
Barometer BMP280 3.3V
USB cable
1. Prepare Your Hardware
We need to connect both sensors to ESP32 Dev Module and then connect the board to the computer with a USB cable to upload the firmware.
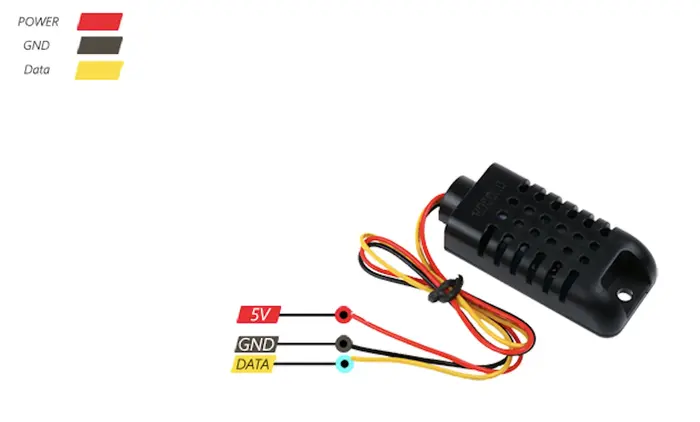
Connect DHT21/AM2301A sensor to ESP32:
5V to 5V on the ESP32
GND to GND on the ESP32
Data to IO25 on the ESP32
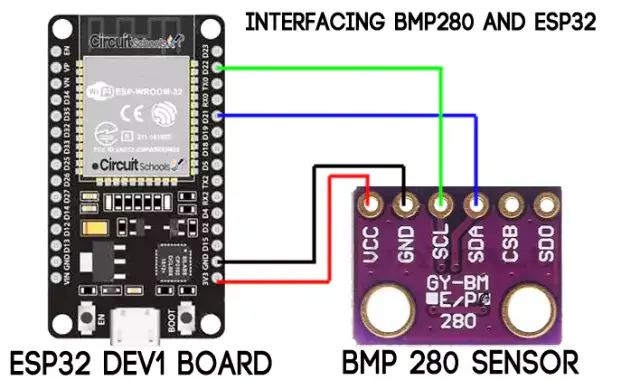
Connect Barometer BMP280 3.3V to ESP32:
VCC to 3Y3 on the ESP32
GND to GND on the ESP32
SDA to D21 on the ESP32
SCL to D22 on the ESP32
Don’t forget to connect ESP32 to your computer with a USB cable.
2. Prepare Required Software
Install Arduino IDE or PlatformIO If you are using Arduino IDE, follow the next steps (skip for PlatformIO)
Install Adafruit BMP280 Library and DHT sensor Library
Select the correct board and port in the Tools menu
Create a new sketch
3. Prepare the Firmware and Upload It to Your Device
We need to include TemplateID and Template Name. Follow the steps below.
Click on the Activate device action in the Template Home tab (this tab should open automatically once you've pressed the Use Blueprint button)
Download zip arhive
Flash your device
For Arduino IDE: Go to Sketch > Add File > Select sketch from the zip archive > Press Upload button
For PlatformIO: Open project > Press PlatformIO: Upload
Scan a QR code to start the device activation process in the app
Click Start
Connect to "Blynk ... " network
Select network your device will use and click Continue
Your device is connected now! Click Finish to open your device. You also will see your device in the Blynk Console
4. Set Up Notifications
Let's configure notifications to keep you informed when the temperature or humidity falls outside the comfortable range. This way, you can take action to restore optimal levels as soon as possible.
Go to the Automations tab
Click +Create automation and choose Device state
Add a name and choose when you want to receive a notification For example, if the temperature is above 28 degrees or below 18, and the humidity is above 60% or below 30%.
In the block When choose your device and choose the parameter, that you want to track. You may set "The less than" and "The greater than" and indicate your desired temperature and humidity.
Select if you want to be notified via email or to receive an in-app message on your Blynk app and click Save
5. Testing
Open your device Dashboard on web and on mobile
You should be able to see the data displayed on the Gauges
In a few minutes the historical data should appear on the Charts
If it doesn't work as described
Reboot the device and check if the data appears on the dashboard
Check if both sensors are connected to the board as shown in the Prepare Your Hardware section
Delete your device and try connecting it again considering the recommendations from the Troubleshooting section at the end of this tutorial
6. Dashboard Breakdown
Widgets are used to display and visualize data, and interact with your device from the web dashboard and mobile app. In order to connect data to a widget, a specific datastream should be assigned to a widget. You can create datastreams in the widget settings or in the Datastream tab of a Template. Below you can find datastreams and widgets used in this project.
1. Datastream V0 - Temperature Name: temperature Web widgets: Gauge (current value), Chart (historical data) Mobile widgets: Enhanced Gauge (current value), Chart (historical data)
Congratulations on creating your own weather station using ESP32 and Blynk! You can now monitor temperature, humidity, pressure, and altitude. Plus, you'll receive notifications on your Blynk app for temperature and humidity thresholds. Enjoy your new weather station and its benefits for a comfortable home!
Check out the following section to explore functionality of the platform and try modifying your project further.
Make sure you have the latest Blynk Library installed
Check that all used libraries are up to date
Check that all the dependencies and configurations are correct
Check your sketch for errors. Click the Verify button to compile your sketch without uploading it
Check your board and port selections
Check your connections. Your board needs to be connected with a data USB cable (charge-only cables will not work). Make sure the cable is fully inserted in the port on each end. Try a different USB cable, and avoid hubs and other adapters if possible. Remove connections to the board pins, especially the 0 (RX) and 1 (TX) digital pins.