Blueprint is a pre-configured template on the Blynk IoT platform, that will help you create a fully functional project in a few minutes. It already includes mobile and web dashboard UI, working firmware, and a tutorial to help you connect your device to the Blynk IoT platform and control it from the app!
On this page you can review the blueprint to have an idea of the ready project you are going to get. Sign up for a free account on the Blynk IoT platform to try it out.
Introduction
This blueprint will help set up bi-directional communication between any Particle hardware and Blynk. You will be able to control an LED from the Blynk mobile app and web dashboard and monitor data sent from the Particle hardware. This project can be upgraded to serve a specific use case, like controlling the irrigation system on the farm, monitoring the fleet of street cleaning vehicles, and so many others.
How It Works
The data is pushed from the Particle device to Particle Cloud and from there to the Blynk IoT platform via a Particle Webhook and Blynk HTTPs API. The data is then visualized on both a Blynk web dashboard and mobile app. Any Particle hardware (Tracker One, Tracker SoM, Boron, B Series SoM, Photon 2, P2, Argon, Photon, Electron, E Series, Core) running the provided firmware will be sending two channels of simulated sensor data from the hardware to Blynk.
One channel will be integer values, and the other will be a floating point value. The data sent will be visualized on the Blynk web dashboard and mobile app. A switch widget on the web dashboard and mobile app will send data to the hardware to control it. The switch data is simply an on/off (1/0) state that will be sent back to Blynk by the firmware to control a Blynk LED widget, and it will toggle the state of the built-in LED on the Particle device if it exists. A UTC-based timestamp will also be displayed on the web dashboard and mobile app so the last time data was published from the Particle device will be known.
Functional Requirements
The firmware on the Particle hardware will push data that includes an integer value and a floating point number (simulated sensor value or another source) at a regular interval of every 5 minutes (adjustable in the firmware)
The last integer value, floating point value, and UTC date-time stamp must be displayed on the web dashboard and mobile app
The historical values for the integer and floating point value must be displayed in a line chart
A switch widget on the Blynk web dashboard and mobile app will be configured to send a state change command (1/0 value) back to the Particle hardware that will turn On/Off the built-in LED (if no LED on GPIO D7 then the user must configure custom GPIO and connect LED)
Communication frequency must be configured to minimize data usage by default for the case when a cellular device is used
Components Used in This Project
Particle Console to activate the hardware and set up the integration
Particle Web IDE, Particle Workbench, or Particle Comand Line to upload the firmware
Any of the following Particle IoT devices:
Tracker One is a complete system including an enclosure. It also comes as a SoM (system on module) known as Tracker SoM. See Tracker button and LEDs for details on how to add an LED to the Tracker One
Any Boron cellular devices, including those that are depreciated, all have a built-in LED on D7
B Series SoM system-on-a-module. No built-in LED, must custom install
Photon 2 is a WiFi device with built-in LED on D7
P2 is an SMD module with WiFi and a microcontroller. No built-in LED. Replaces the depreciated P1
Argon is a depreciated WiFi device with built-in LED is on D7
Photon is a depreciated WiFi device with built-in LED on D7
Electron is a depreciated cellular device with built-in LED on D7
E Series is a cellular device. No built-in LED
Core is a WiFi device with built-in LED on D7
1. Prepare Your Hardware
Hardware will require a suitable power connection and either a cellular or WiFi connection
Devices with a built-in LED connected to GPIO D7 (Boron, Argon, Photon 2, Photon, Electron, Core) will be detected by the firmware and this physical LED will be turned on/off in addition to the LED widget on the web and mobile dashboard.
2. Create Particle Integration Webhook
A Particle integration webhook running on the Particle cloud will accept the data from the Particle.publish() function executing on the device, and transform it into a HTTPs GET that will post data to the Blynk cloud, updating the corresponding Blynk datastream values.
Go to Products > New Product to create a new Product, and then add your device
Make sure your device is connected to the Particle Cloud. If this is not the case, connect it manually.
After the device is added and connected to the Particle Cloud, click on the Integrations on the left > Add New Integration and select the Webhook option
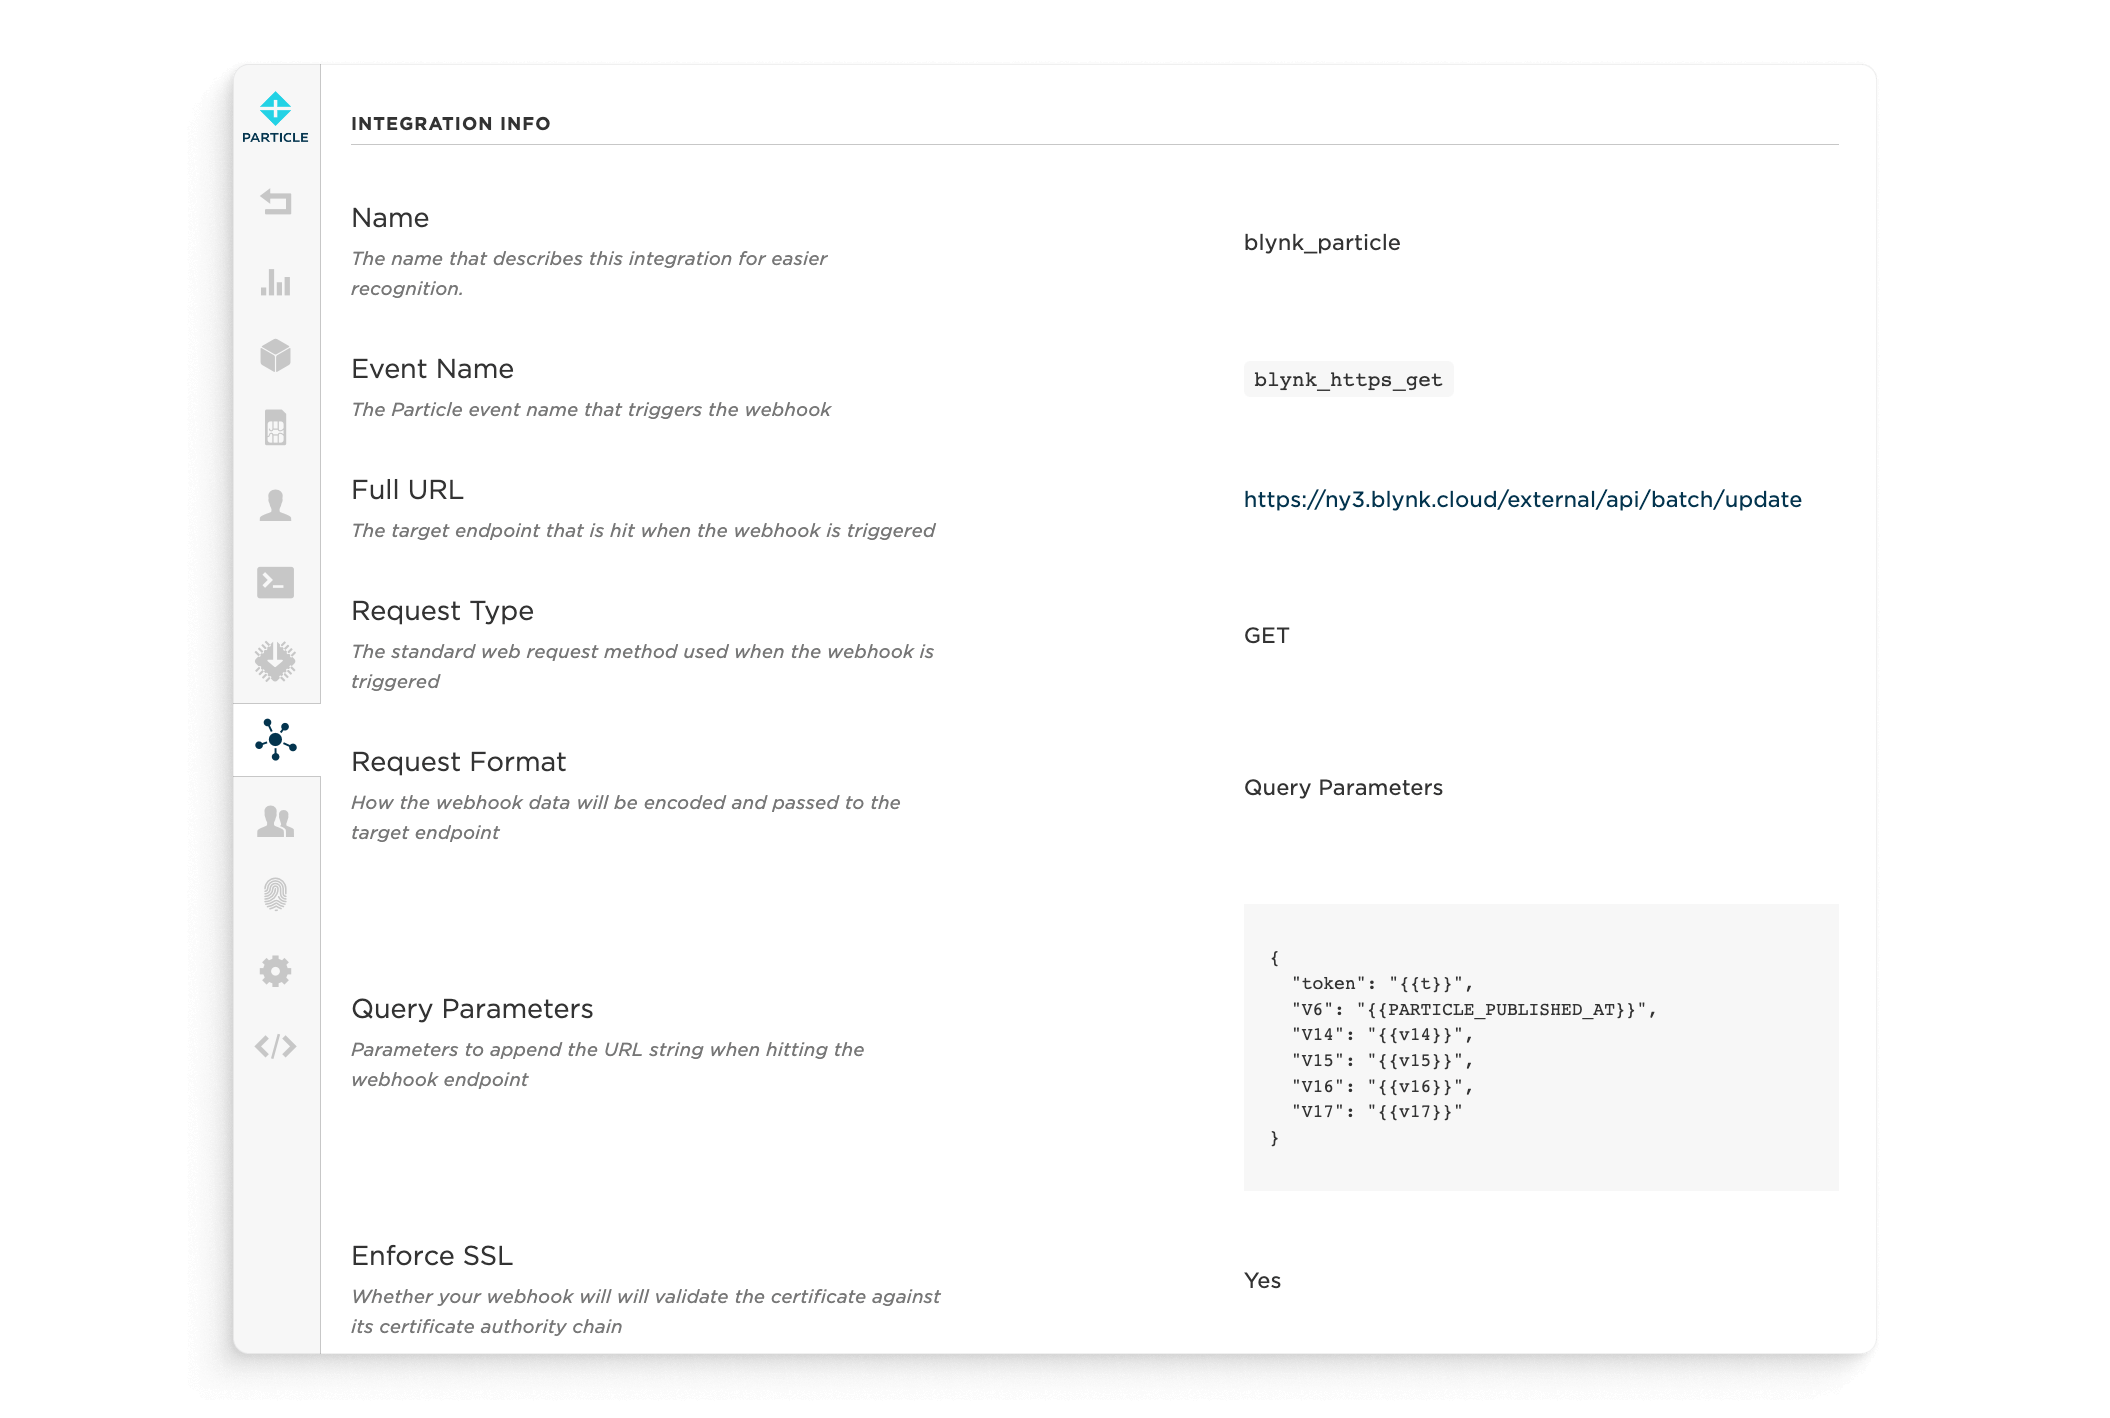
Switch to Custom template and fill it with the following lines:
Update ny3.blynk.cloud with your server shown in the Blynk.Console lower right. Find the list of valid server addresses here
Click on Create Webhook
The Webhook should look like this:
Particle.publish() call in the firmware:
Note that the firmware will pass the unique BLYNK_AUTH_TOKEN defined for each device to the Particle webhook as the variable {{t}}. This allows each device to call the same webhook, at the expense of increasing the cellular payload for each transmission by 32 bytes.
You can learn more about Particle webhooks in the Particle documentation.
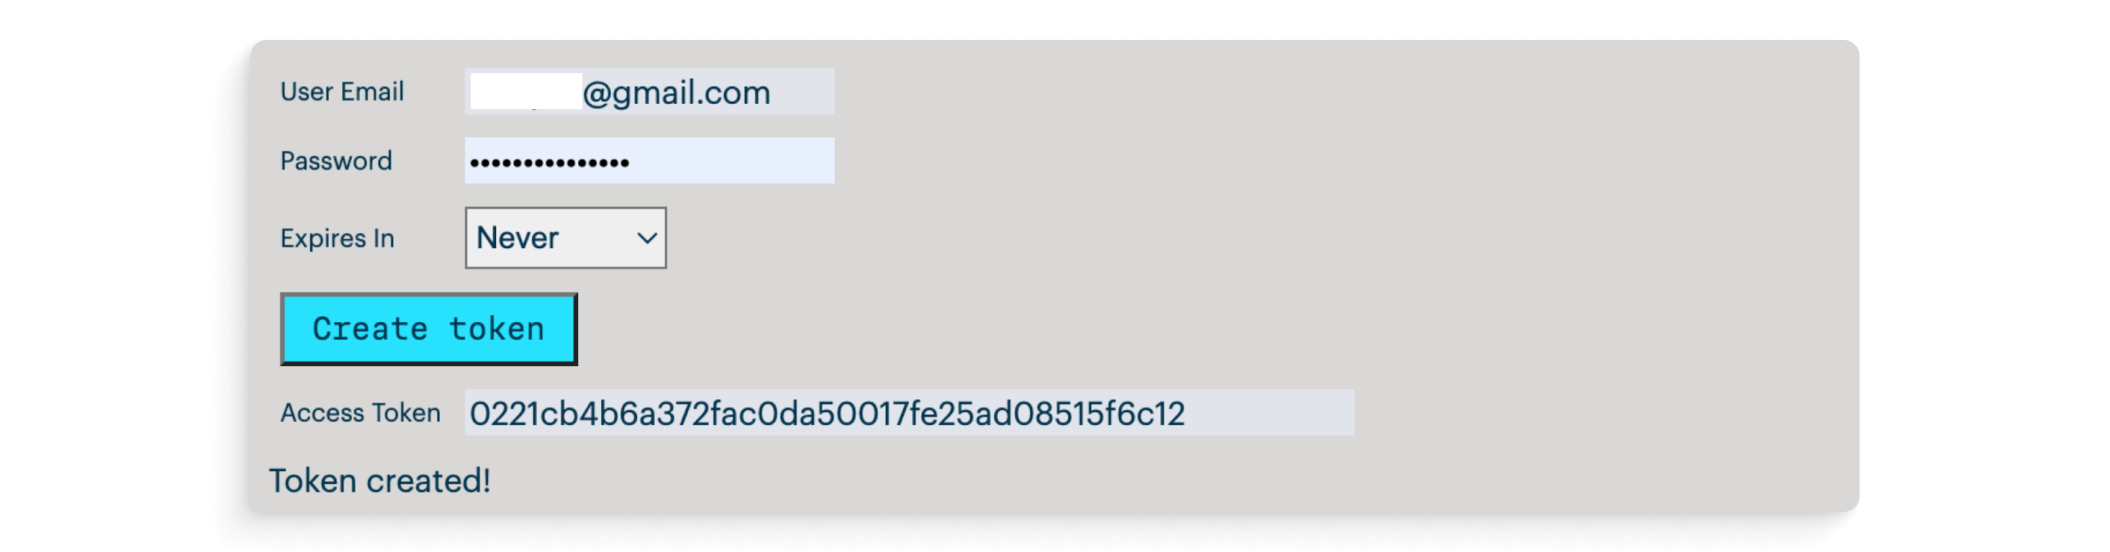
Generate Particle Access Token
The Blynk webhook will need a Particle access token to make a Particle HTTP API call to the Particle cloud function.
Browse to the Particle documentation section Create a token.
Enter your Particle login email and password into the form. If you have MFA (multi-factor authentication) enabled on your account, you will need your MFA code to generate the access token.
Click the Create token button to generate a token. Keep this token confidential.
4. Prepare the Firmware and Upload It to Your Device
Communication between the hardware and Blynk will utilize the Blynk HTTPs API. The Particle device will publish a JSON string to the Particle Cloud, referencing a Particle webhook. The webhook reformats the data, and then sends it to the Blynk Cloud via an HTTP GET, updating the Blynk datastreams.
We need to include TemplateID, Template Name and AuthToken (unique identifier of your device) in the sketch.
Click on the Activate device action in the Template Home tab (this tab should open automatically once you've pressed the Use Blueprint button)
Follow the proposed steps to prepare and upload the code
Restart your Particle device and allow it to connect to the Particle Cloud
Once the code is successfully uploaded and device is connected, the interface will suggest you to proceed to the My Devices section
It may take some time for a device to connect to the Blynk Cloud, don't close the device acivation window
Check the Troubleshooting section at the end of this tutorial if you have issues uploading the firmware
5. Blynk Webhook Setup
Control of the Particle hardware remotely from the Blynk web dashboard or mobile app is accomplished using a Blynk webhook and the Particle HTTP API. When the state of the switch widget on the Blynk web dashboard or mobile app is changed, a Blynk webhook assigned to the same datastream is called. The webhook makes a Particle HTTP API call to a Particle cloud function with a device-unique token that sends data to the Particle hardware.
In the Blynk.Console, navigate to Settings > Webhooks and create a new webhook for datastream V16 based on the information shown in the next image
After you are finished configuring the webhook, click Test webhook to verify it doesn’t throw an error (it won’t send the datastream value here, so don’t expect to see the LED on your Particle device change)
Click Create Webhook to save it and close the dialog
Note that the Blynk webhook request quota is 1 per minute* so any datastream value changes sooner than 60 seconds will not execute the webhook.
Webhook URL
The format is:
Replace your Particle device ID and the 40-character access token you generated earlier in the corresponding form fields. Your 24-character Particle device ID is available in the Particle console.
The "blynk_led" at the end of the WEBHOOK URL is the Particle cloud function key that is referenced in the firmware as:
HTTP Headers (optional)
The 'HTTP Headers' with the key "Authorization" has a value consisting of the string "Bearer " (with a space after it), and then followed by the 40-character Particle access token.
6. Test the Project
Follow the steps below to make sure everything works as it is supposed to.
Test the Particle cloud function running in the firmware by calling it from the Particle console. With your Particle hardware running, visit here for detailed instructions on how to call 'blynk_led'. Go to your Particle console, select the Particle device, and then under the Functions section on the right side of the screen you will see the function key of ‘blynk_led’ listed. Enter ‘on’ in the Argument input area and click the CALL button. Observe the Particle device to confirm that the built-in blue LED on D7 turns on. Repeat with the ‘off’ argument to turn off the LED.
Verify that your Particle access token is correct by using the Particle API to test it. Detailed instructions on how to do this using Postman can be found here.
Test the Blynk webhook by installing the firmware on your Particle hardware, and then click Test webhook to verify it doesn’t throw an error (it won’t send the datastream value here, so don’t expect to see the LED on your Particle device change). Then from the Blynk web dashboard or mobile app, toggle the switch assigned to datastream V16 and observe the built-in LED on the hardware if it exists, or the Blynk LED widget if no built-in LED exists. Wait 60 seconds between each toggle off the switch widget.
Don't be concerned about the "Offline" network indicator status in the web console and app. It occurs because the Particle device is not connected to the Blynk Cloud directly, but to the Particle Cloud. However, you can always check the "Last Update" data in the web console or mobile application. If the difference between the current time and this timestamp is more than the update interval set in your sketch (for this project, it's 5 minutes), then most likely your Particle device has gone offline.
Review the Particle device log to confirm the device is connected and to see what data has been published from the hardware to the Particle cloud.
Review the Particle integration log to see if it was triggered successfully and the data that was pushed to it from the Particle device.
Template Breakdown
Every project you make on Blynk becomes a Template that you can use to create and manage similar devices.
Every template consists of:
Settings - general settings like which device and connectivity type. For this project, it can be any Particle hardware with WiFi or Cellular.
Datastreams - channels for time-stamped data transmitted between the device and the cloud. Check out the table below to see the list of datastreams for this project and what each of them is used for.
Web and mobile dashboards - GUI to send data from web and mobile apps through datastreams to your devices. Dashboards are made of widgets. In this project, we used Switch and LED widgets to control and see the state of an LED on a device. Also, we used Lables (Labeled Value on Mobile) to display real time data and Chart widgets for historical data.
Troubleshooting
Make sure the BLYNK_AUTH_TOKEN in your firmware matches what is shown in the Blynk console Search > Device > Device Info.
If your Particle device has a built-in RGB then it should be breathing cyan if it is connected to the Particle cloud.
Perform all of the tests under Testing to be sure that each communication step from the Particle hardware to Blynk and back works properly.
Conclusion
Congratulation on connecting a Particle board to Blynk! Check out the following section to explore the platform functionality and try modifying your project further.
Next Steps
After your device is connected to Blynk, this project can be modified to include more functionality.
Explore Blynk no-code Web Dashboard and Mobile App builder - it's so easy to create custom interfaces to visualize data and interact with an IoT device.
Try Automations. They allow the end-user of your app to create scenarios where the device automatically performs one or more actions based on a condition. For example, you can trigger a phone notification or send an email when the sensor data reaches a specific value.
Blynk User Management functionality allows you to share devices with other users - from a few to thousands and offers a simple and flexible way to set up and manage multi-tenant IoT applications at any scale.
Explore Blynk Organizations, which will help you categorize your devices and users, assigning them roles, permissions, and locations.
Add sensors and modify the firmware to match your project needs.