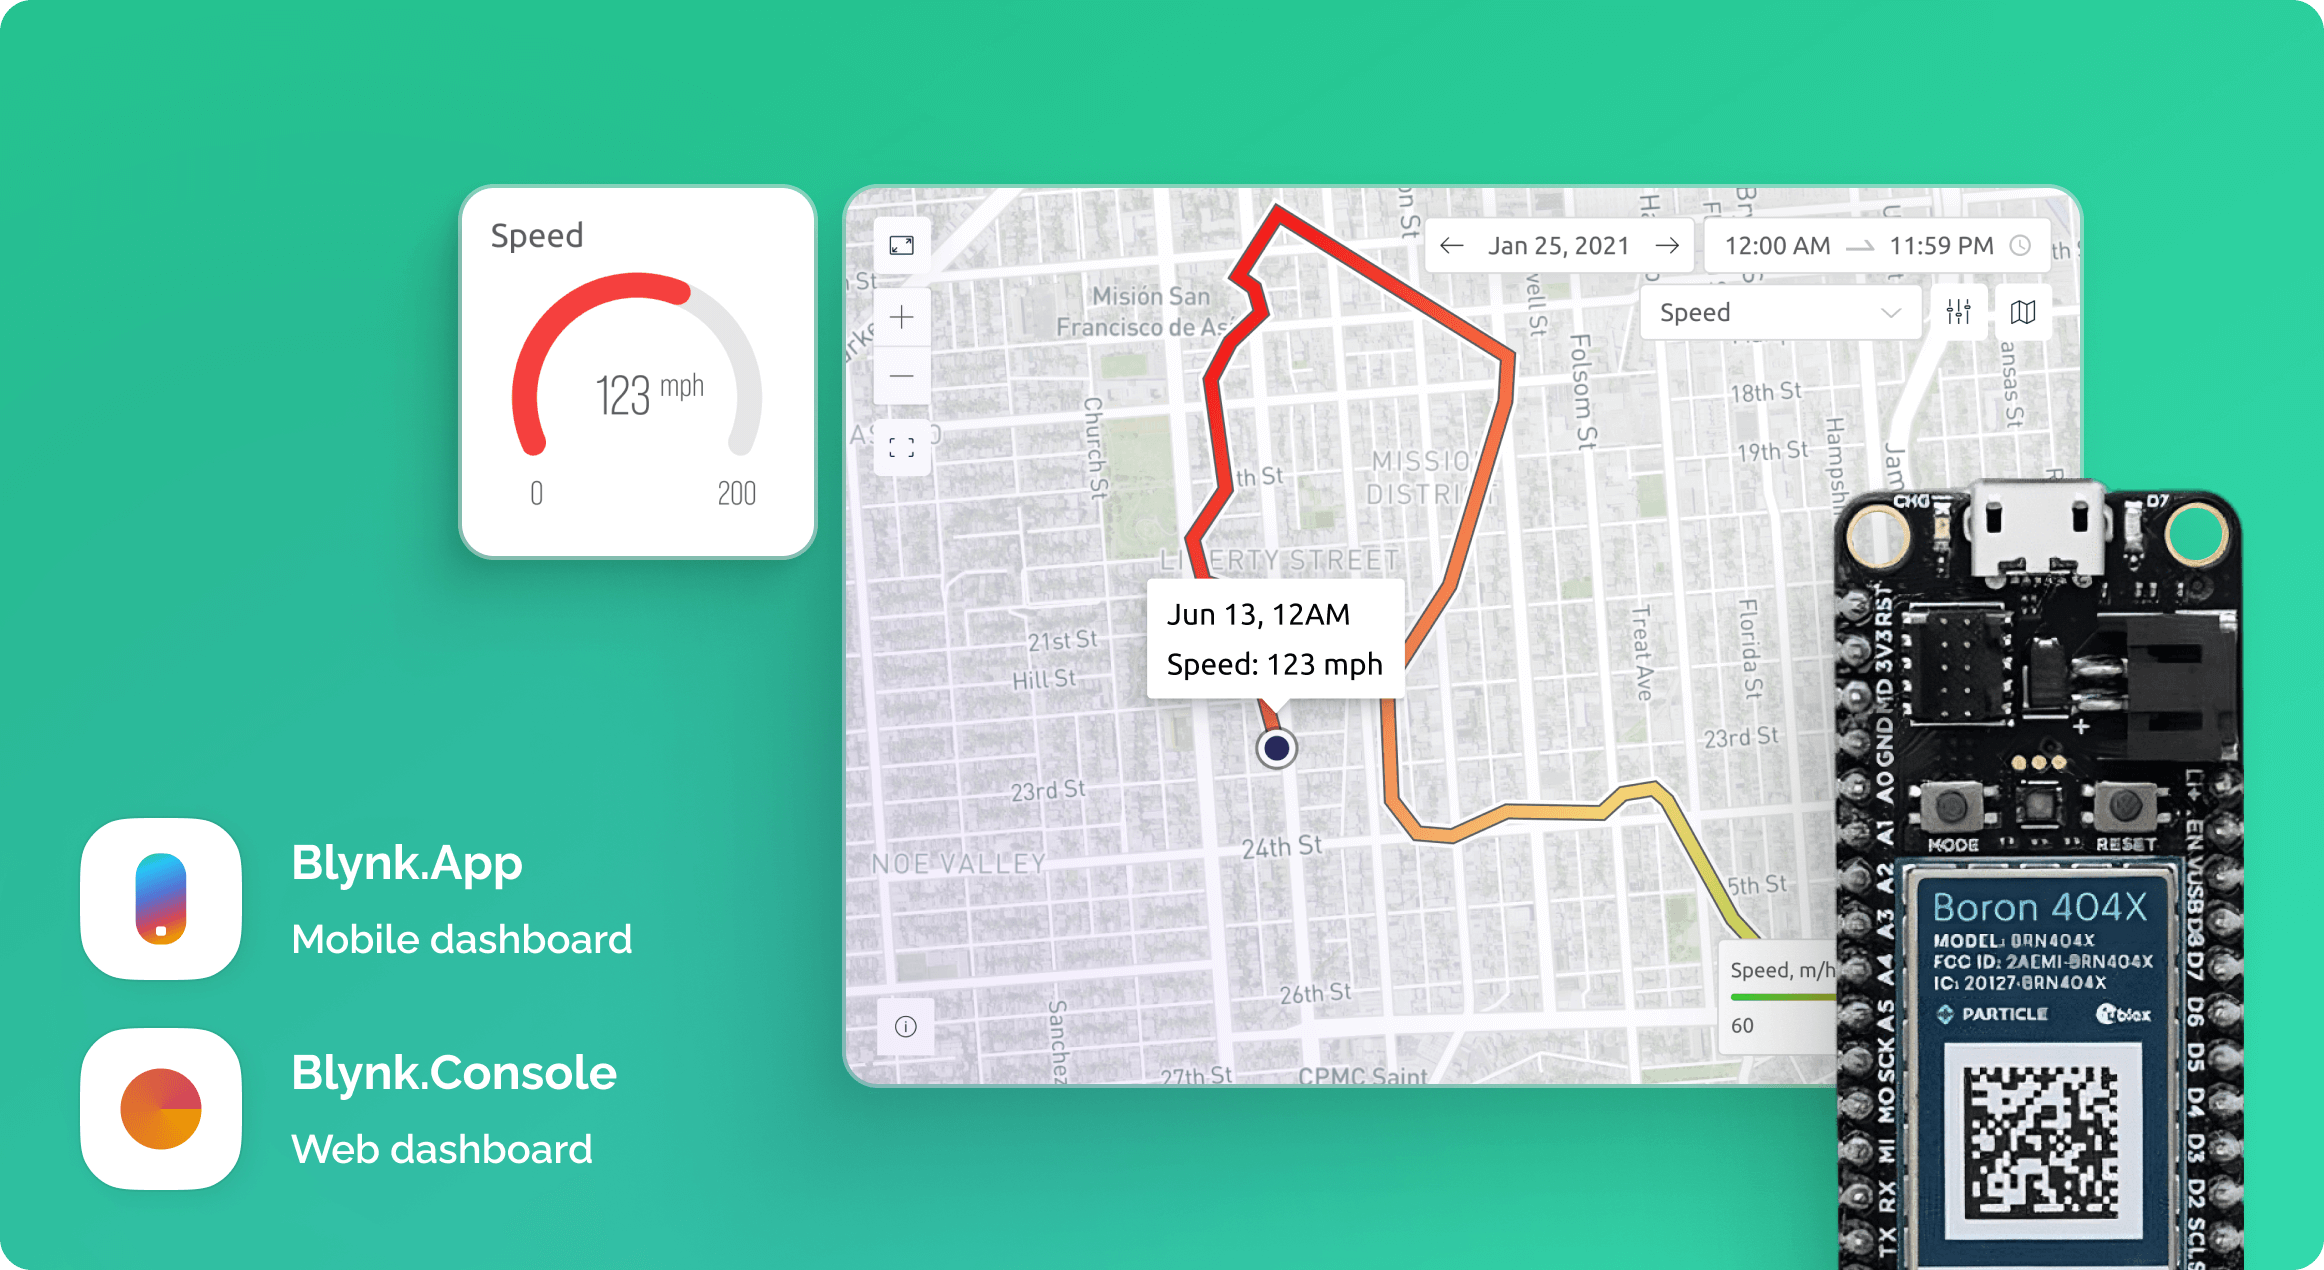

This blueprint is a basic asset tracking solution. You will be able to see your moving device on the map from the web and mobile dashboards, monitor it's speed, and receive a notification once the position of your asset has changed. Use it as is or build more functionality on top if you want to receive different data from your moving asset.
The web and mobile dashboard and datastreams are pre-configured. You will be creating an integration with the Particle Cloud using a detailed step-by-step guide.
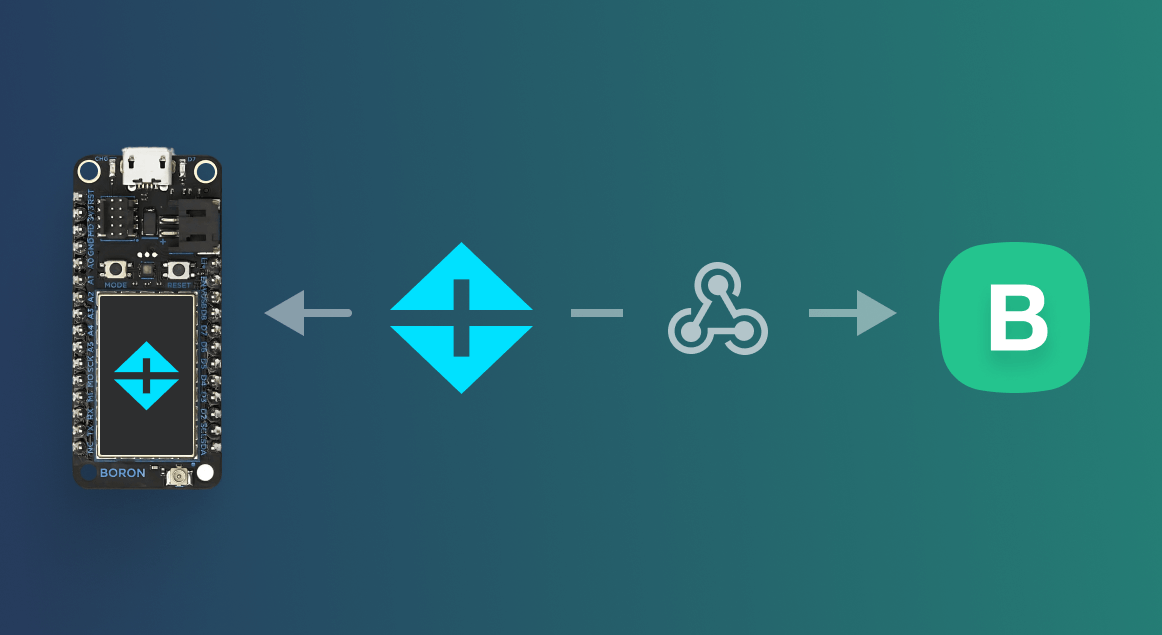
We will be using a Particle Boron with attached GPS FeatherWing, that reads the device location. The location data is pushed from the Particle cellular device to Particle Cloud and from there to the Blynk IoT platform via a Particle Webhook and Blynk HTTPs API. The data is then visualized on both a Blynk web dashboard and mobile app.
Functional Requirements
The Boron is physically stacked on top of the GPS FeatherWing, completing the electrical connection between them. The Boron and the GPS FeatherWing communicate over the Boron UART pins.

We need to create two Particle Webhooks to transfer the data from the Particle Cloud to Blynk. The first webhook to push the data when the position of device has changed more than 122 m and the second one to push the data from the Particle Boron board as soon as it's online.
The keys on the left (token, V3... V12) refer to Blynk datastreams, and the values on the right reference variables from the firmware that will be passed from the Particle.publish() function. The value ‘PARTICLE_PUBLISHED_AT’ for virtual pin V6 is a Particle pre-defined variable that provides a timestamp for when the webhook is executed.
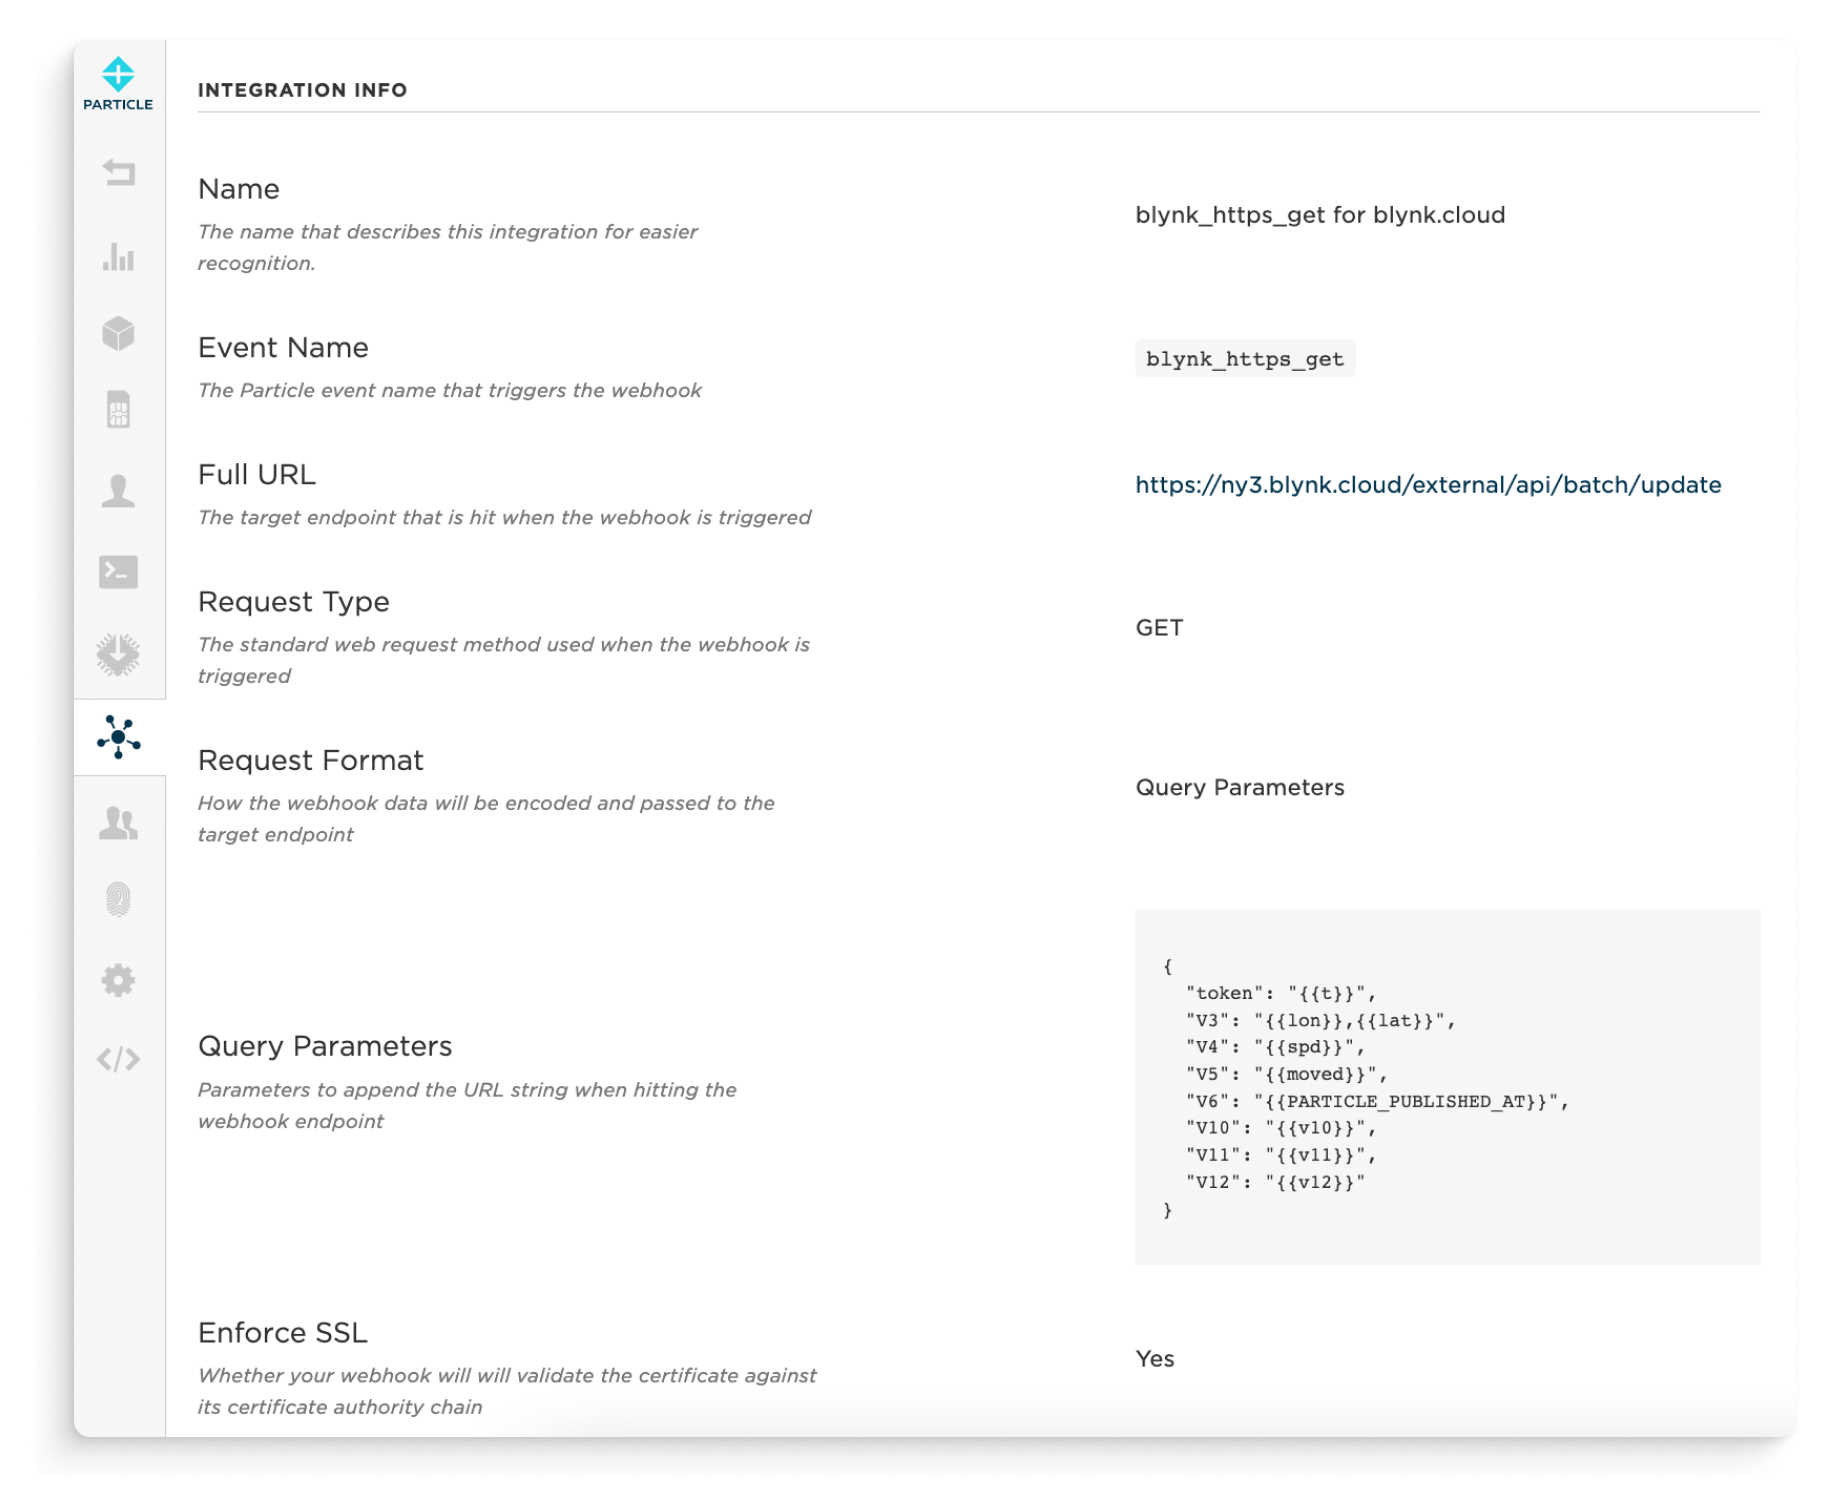
Cellular communication between the hardware and Blynk will utilize the Blynk HTTPs API to minimize cellular data usage. The Particle Boron cellular IoT device will publish a JSON string to the Particle Cloud, referencing a Particle webhook. The webhook reformats the data, and then sends it to the Blynk Cloud via an HTTP GET, updating the Blynk datastreams.
We need to include TemplateID, Template Name and AuthToken (unique identifier of your device) in the sketch.
Check the Troubleshooting section at the end of this tutorial if you have issues uploading the firmware
Recommendation: to minimize cellular data usage, the minimum publishing interval should be updated to a longer duration such as 300000 ms or 5 min instead of 60000 ms (in the sketch - const uint32_t TIMER_INTERVAL_MS = 60000). Do it after the sketch has been fully tested by changign the number.
Widgets are used to display and visualize data, and interact with your device from the web dashboard and mobile app. In order to connect data to a widget, a specific datastream should be assigned to a widget. You can create datastreams in the widget settings or in the Datastream tab of a Template. Below you can find datastream and widgets used in this project.
1. Datastream V3 - GPS Position Coordinates
Name: Location
Web widgets: Map (visualise position), Label (coordinates)
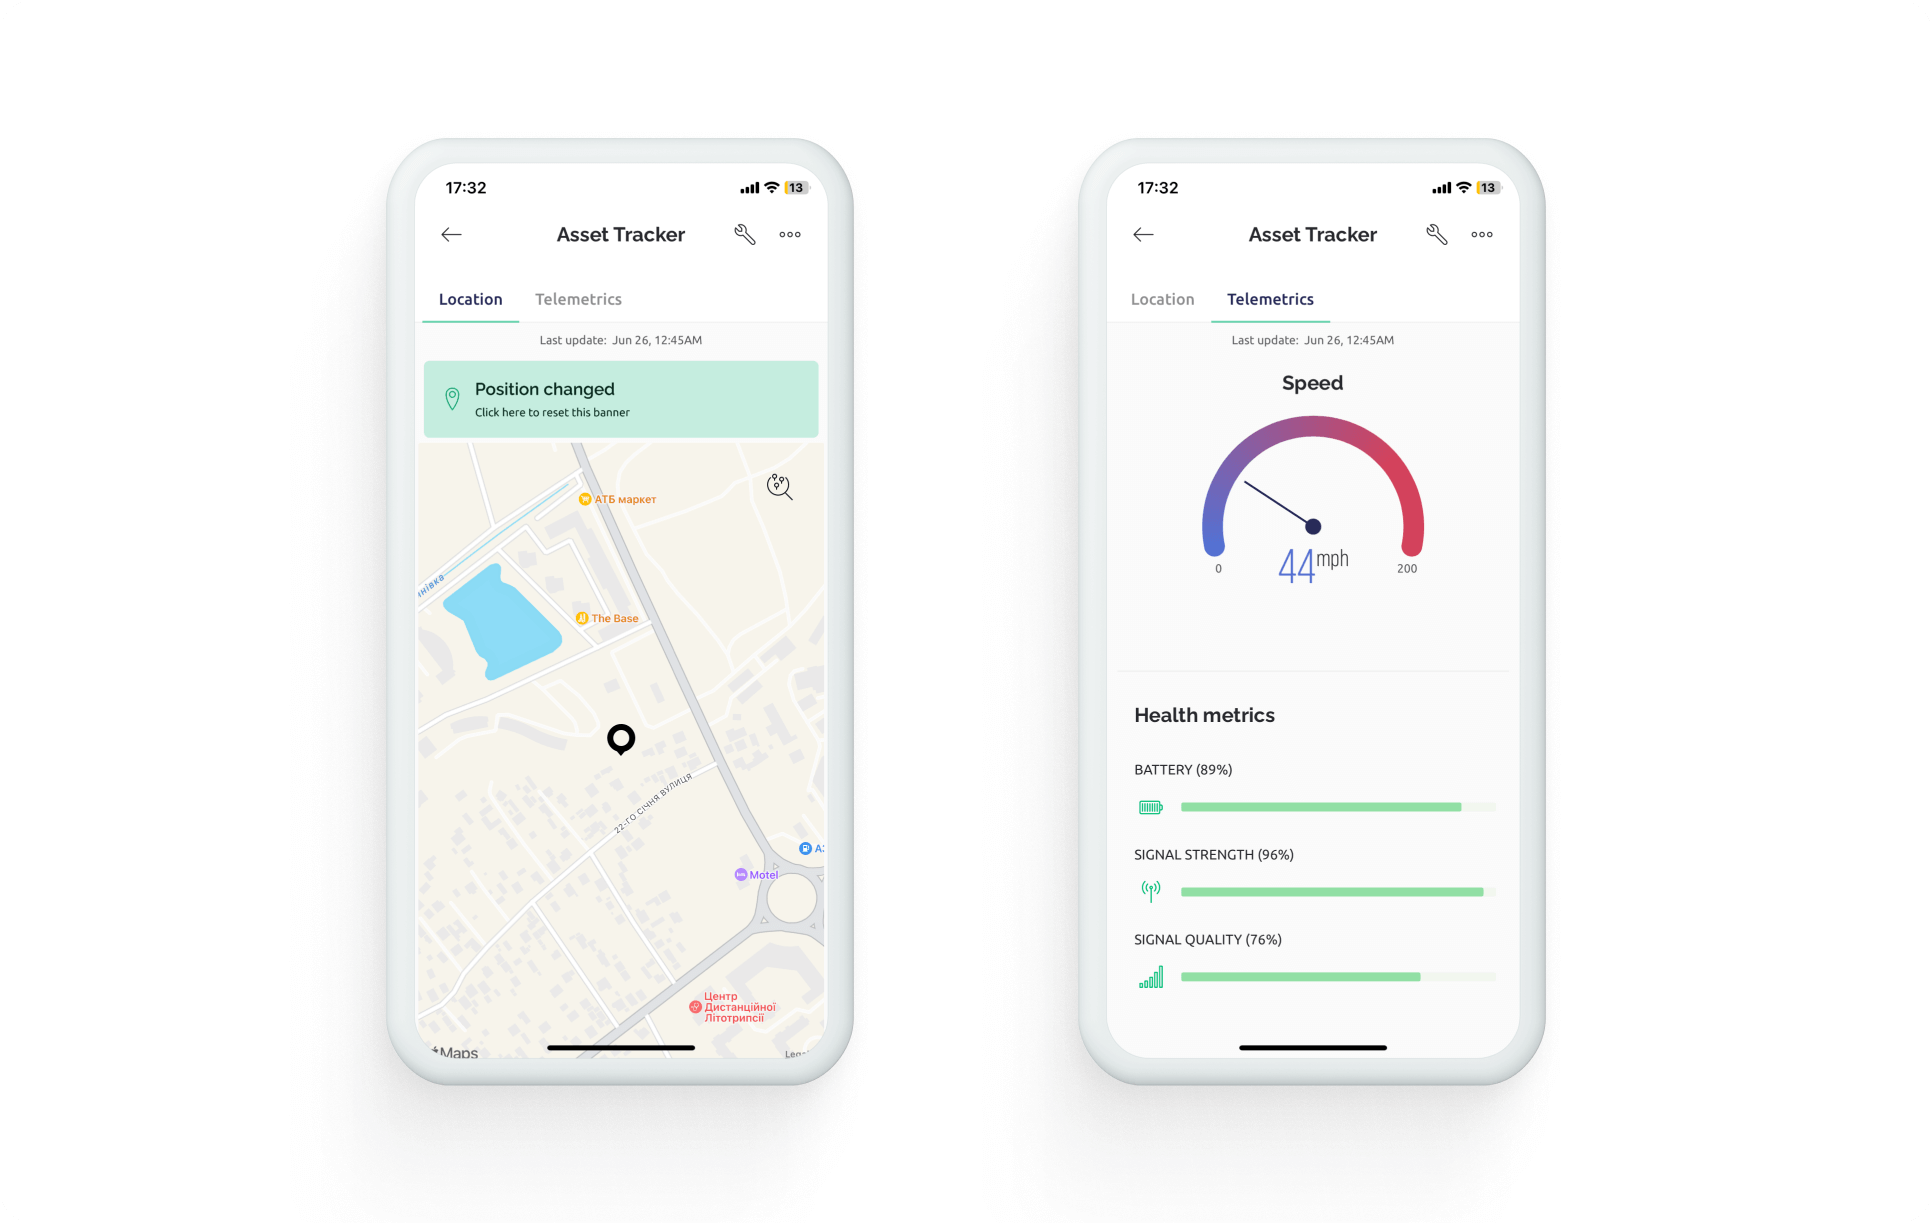
Mobile widgets: Map (visualize position), Labeled Value (coordinates)
2. Datastream V4 - Device Speed (mph)
Name: Speed
Web widgets: Label / Gauge / Chart
Mobile widgets: Value Display / Labeled Value / Gauge / Chart
Note: The speed is also added to a web dashboard map widget as an overlay.
3. Datastream V5 - Position Change Indicator
Name: Position Changed
Web widgets: LED / Switch
Mobile widgets: LED / Switch / Value Display
Note: V5 will be updated to a value of 1 by the hardware when it has changed by more than 122 m / 400 ft since it was powered on, or since the last time data was published. Position Delta is 122 m / 400 ft can be adjusted in the hardware, but not to smaller number. Hardware determines the change in position from the last published GPS coordinates. The datastream value is not updated to a value of 0 by the hardware, so this should be done with an automation if the feature is to be used.
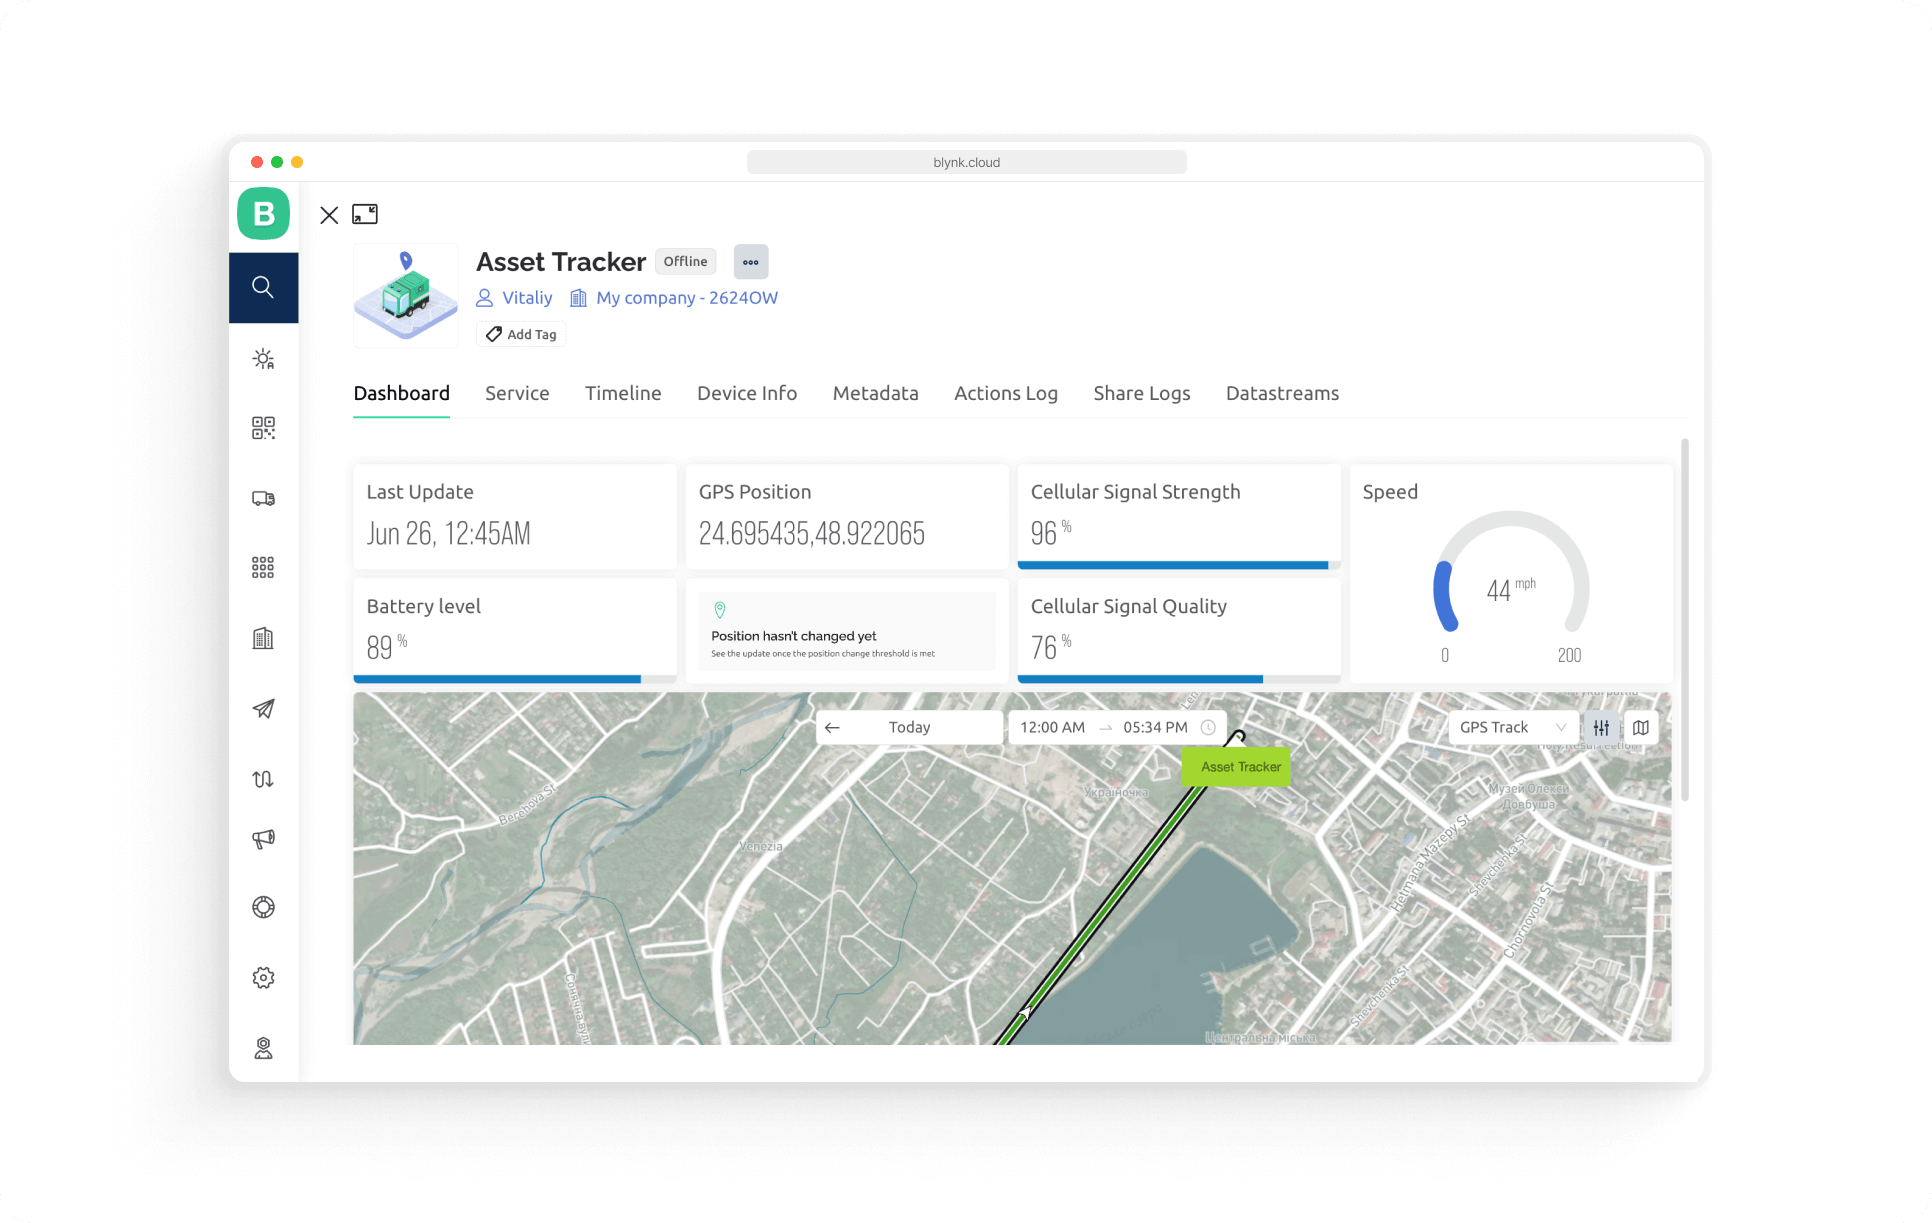
4. Datastream V6 - Last Published Position Date and Time
Name: Last Update
Web widgets: Label
Mobile widgets: Label Display / Value Display
5. Datastream V10 - Battery Charge
Name: Battery Level
Web widgets: Label
Mobile widgets: Label Display / Value Display
Note: The value is "no battery" when no battery is connected, otherwise 0.0 to 100.0 where a larger value is better.
6. Datastream V11 - Cellular Connection Strenght
Name: Cellular Signal Strength Web widgets: Label
Mobile widgets: Label Display / Value Display
Note: It is -1 when the value is unknown, otherwise it is 0.0 to 100.0 where a larger value is better.
7. Datastream V12 - Cellular Connection Quality
Name: Cellular Signal Quality Web widgets: Label
Mobile widgets: Label Display / Value Display
Note: It is -1 when the value is unknown, otherwise 0.0 to 100.0 where a larger value is better.
Let's create an automation to notify the user when the device position has changed more than 122 m / 400 ft since it was powered on, or since the last time data was published (firmware variable TIMER_INTERVAL_MS).
Try also to:
If it doesn't work as described
Congratulations on creating a basic asset tracking solution! With this project, you have built a system that allows you to track the movement of your device on a map, both through web and mobile dashboards. You can now monitor its speed and receive notifications whenever the position of your asset changes.
Try customizing and expanding upon this solution to suit your specific needs. You have the flexibility to receive different types of data from your moving asset, allowing you to adapt the project according to your requirements.
Blynk Troubleshooting guide
Documentation
Use these detailed tutorials to create a project from scratch that will allow sending data from Particle device to Blynk and controlling a device from Blynk app and web dashboard:
How to connect a Particle device to Blynk
How to control a Particle device with Blynk